

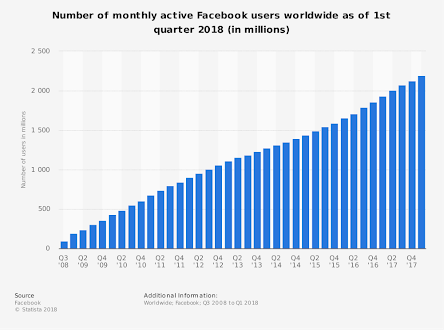
Are you thinking about creating an ad on Facebook for your business? Well, that’s long overdue. With a monthly active user base of 2.19 billion people, you’ve been missing a lot of opportunities for your business.
Table of Contents
- Factors to consider before building a Landing Page for Facebook traffic
- Landing page hosted on Facebook
- Landing page hosted on an external website
- Landing pages hosted on Facebook
- Build Facebook landing page on Instapage
- Use Lander app to create your Facebook landing page
- Landing pages on external websites
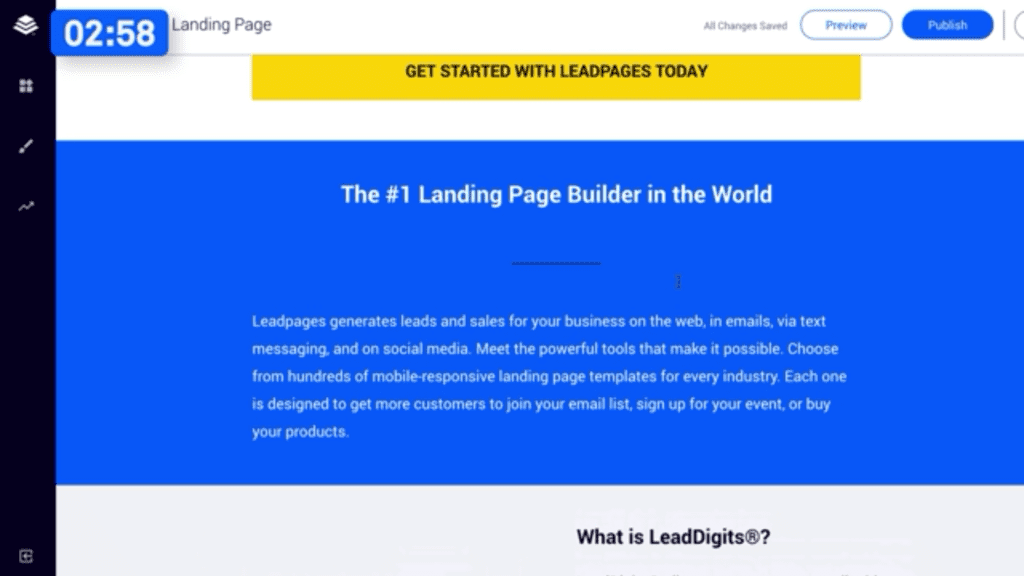
- Build Facebook landing page on Leadpages
- Build Facebook landing page on WordPress
- Facebook Lead Ads
- Write your copy
- Best practices for building a landing page for Facebook
- Conclusion
A landing page is an effective means of capturing leads for your business. You can convince your audience with targeted content and get them to submit their information in exchange for your offer.
In fact, a Landing Page is one of the most effective ways of gaining leads for your business in social media marketing campaigns.
How do these connect together? You can use Facebook ads to drive more traffic to your landing page and consequently gain more leads.
Sounds simple right? Well if Internet marketing has taught us anything, it’s that things are rarely as simple as they seem. If they were, we would all just create an ad and a page in few minutes and go to sleep. And the leads would rush in right?
A large number of marketers have failed to capture many leads from Facebook through their landing pages. But it also needs to be said that some have captured many qualified leads for their businesses through this means. How did they go about it?
How do you build a landing page that convinces visitors from Facebook to submit their information to you? This is what you’re going to learn by the end of this post. Our Digital Marketing Agency in Atlanta uses these same principals for the Facebook campaigns of our clients.
Factors to consider before building a Landing Page for Facebook traffic
Some common factors you should consider include:
i). Aim of advertisement
People use Facebook ads for many reasons. Some for more likes to their pages, or more exposure, or many other reasons. In this case, though, you’re using Facebook traffic to capture leads.
ii). What is your value proposition?
What is the value you’re going to deliver in exchange for your visitor’s personal information? There are many things you can offer to your visitors and this should be of real benefits to your visitor while also related to your business. These includes:
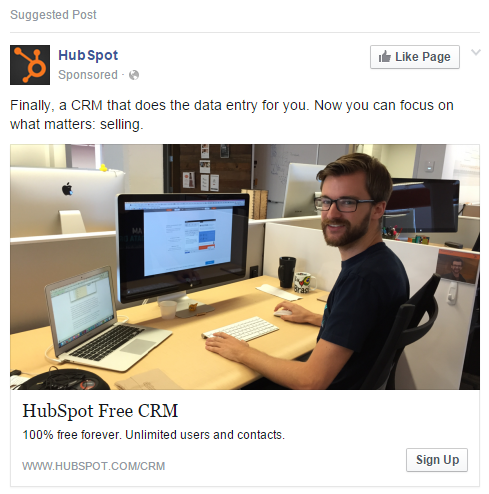
Free service/product: you can offer a part of your service or one of your products for free for any user who submits their information. Free has an appeal and I don’t think it will lose that appeal any time soon.
This is an example of HubSpot offering a free service as its value.
Discount/coupons: offering discounts to new subscribers could be a strong incentive to users who want to buy your products or subscription. This is especially effective if you’re running an ad for an ecommerce business.
Contests: who doesn’t like winning a contest? Give your visitor an opportunity to win a valuable product or a year subscription to your service and they’ll be willing to contest.
Ebooks: an ebook on a topic your audience are curious about is a draw to capture them as leads.

Webinar: visitors can also use their information to register for your webinar free of charge.
Free consultation: if you provide consultation services, you can offer a free consultation for users who sign up. For instance, this could be a 30-minute or 1-hour session. We do this for all of our Atlanta SEO customers.
ii). Budget
How much do you plan to spend during your campaign? Of course, you don’t need to spend a huge amount of money before you can achieve your targets.
But your ads budget will determine your strategy and the number of people you can reach.
iv). Product/service:
The product or service you’re offering to your audience.
v). Select your audience:
Trying to please everyone is the fastest way to please nobody. When you’re crafting your ad and landing page, you must have a specific audience in mind.
In fact, it’s better to have a buyer persona that helps you create your ideal target. Just one person. This way, your landing page has a focus to attract only your ideal customers.
This also helps to select user demographics when you target your ads. With the knowledge of details like age, location, education level, etc. you can target the right people.
vii). Retargeting:
When a visitor gets to your landing page but fails to release their information, what are you going to do? There are two options: you can retarget the user or just see them as a loss.
A user who has gotten to your landing page had a level of interest. You can retarget them as the Facebook conversion pixels on your landing page gives the details of such users. This will cost you more but it can be worth it if you end up getting those leads.
Having said these, you need to know that there are two ways you can create landing pages for your Facebook ads:
Landing page hosted on Facebook
In most cases, Facebook want to keep users on the social platform and it prefers if you have your landing page as part of your Facebook page. This means you can capture leads without users leaving Facebook.

This is easier for users as they can continue their social experience. It’s also good for Facebook and they reward this with a lower price for your ads.
Landing page hosted on an external website
In some cases, you may feel that a landing page hosted on your website will do a better job of capturing leads for your business.
A landing page also gives you the opportunity to use as much content as you can to convince your potential leads. Your landing page hosted on Facebook doesn’t have a lot of provisions for much texts.
Another thing you may have when leads come to your website is that you can link to more content on your website where they can even get more information about the product or service you’re offering.
Even when visitors give you their information, there are more opportunities for them to go to your website to engage with your content.
You’ll miss all these opportunities if your landing page is hosted on Facebook. You need to note, however, that you’ll pay more for your ads if your landing page is on an external website.
In this post, we’re going to consider how you can go about both.
Landing pages hosted on Facebook
These are pages hosted as a tab on your Facebook pages. We’ll consider two software packages you can use to do this.
Build Facebook landing page on Instapage
To use Instapage to build your landing page, you can either start building your landing page with one of the templates or use a created Instapage file or scan an existing page.
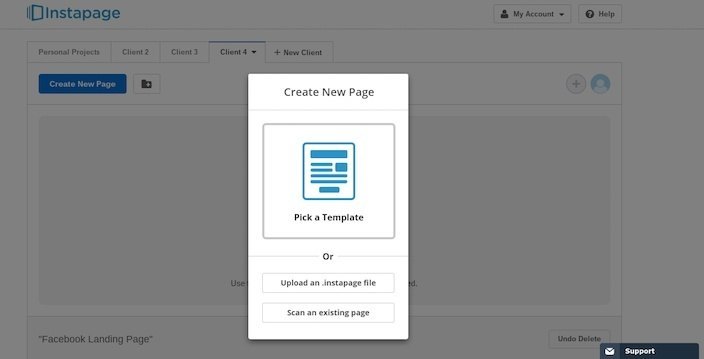
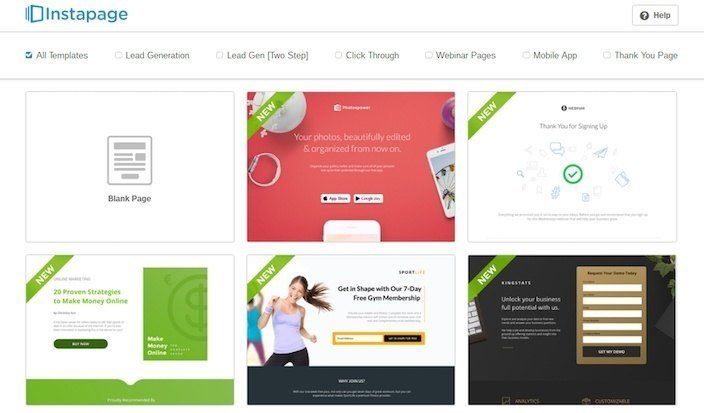
Let’s say you’re starting your page afresh with a template. When you select ‘Pick a template’, you have to pick one of the six types of templates available. These templates include:
- 2-step lead gen template
- Lead gen template
- Webinar template
- Click-through template
- Mobile app template
- ‘Thank you’ page template
When you select the type of template you want, you can start customizing it to your taste.
Important things to customize on your page includes:
Headlines that shows benefits: your visitor must know what value to expect from your headline.
Clear copy: your landing page copy must explain your value proposition in simple terms. This is not the place to use industry jargons your customers would find impossible to understand.
Testimonials: this shows that people have used your products in the past and found it effective.
Social proof: you can give the number of your customer base or important clients you have that shows your business is popular. This is an example of a landing page that shows social proof.
Visuals: people process visual content like images and videos faster than plain text and you should incorporate this into your content to improve your conversions.
After adding these important elements of your page, enable a mobile view of your page so that you can have a mobile-responsive page.
To do this, navigate to the upper-left portion of your page and click on ‘Mobile.’ A drop-down shows ‘Mobile Enabled’ or ‘Mobile Disabled.’ Select enabled if it is not already enabled.
Now that you’re done with your page, navigate to the upper-right corner of your page and click ‘Publish.’ This brings you various options of where to publish your page.
Click on ‘Facebook.’
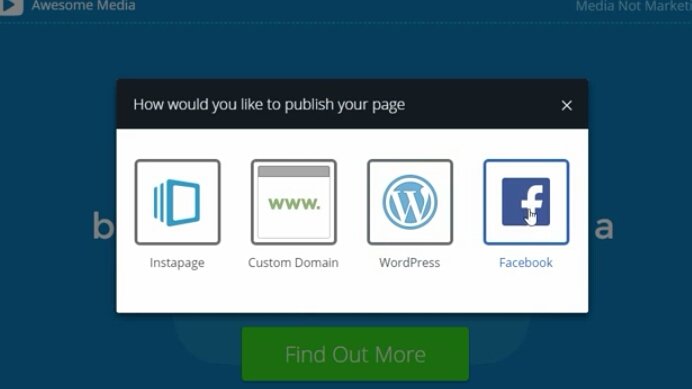
After this step, select the Facebook page you want to add the landing page to.
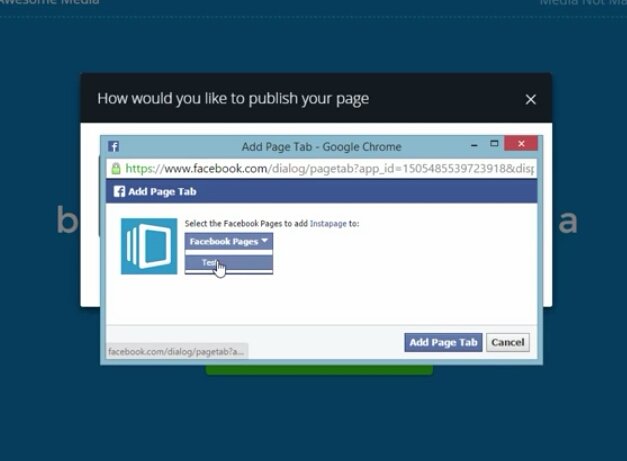
When you select this page, you’ll be given a Facebook URL for your landing page in a popup box.
Use Lander app to create your Facebook landing page
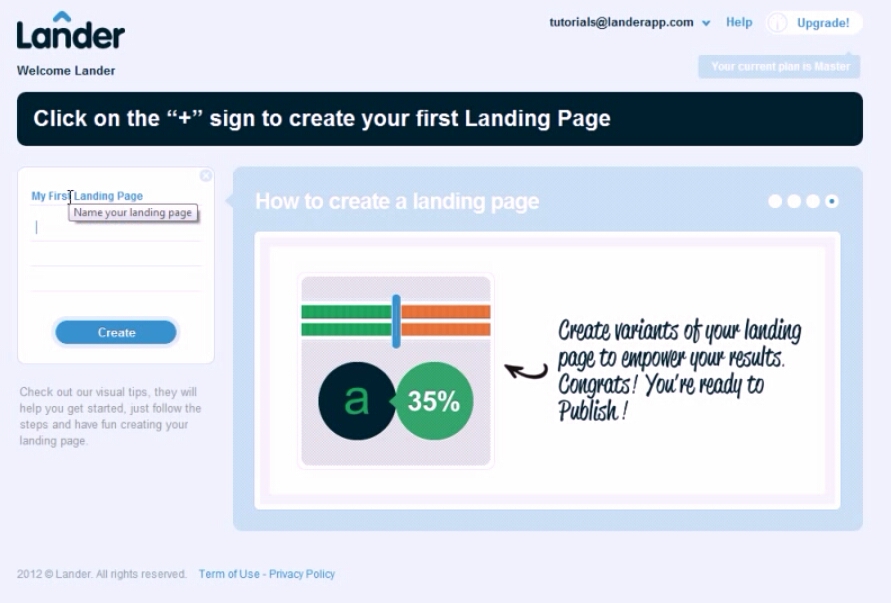
To create a landing page on Lander, click on the ‘New Landing Page’ link on your dashboard.
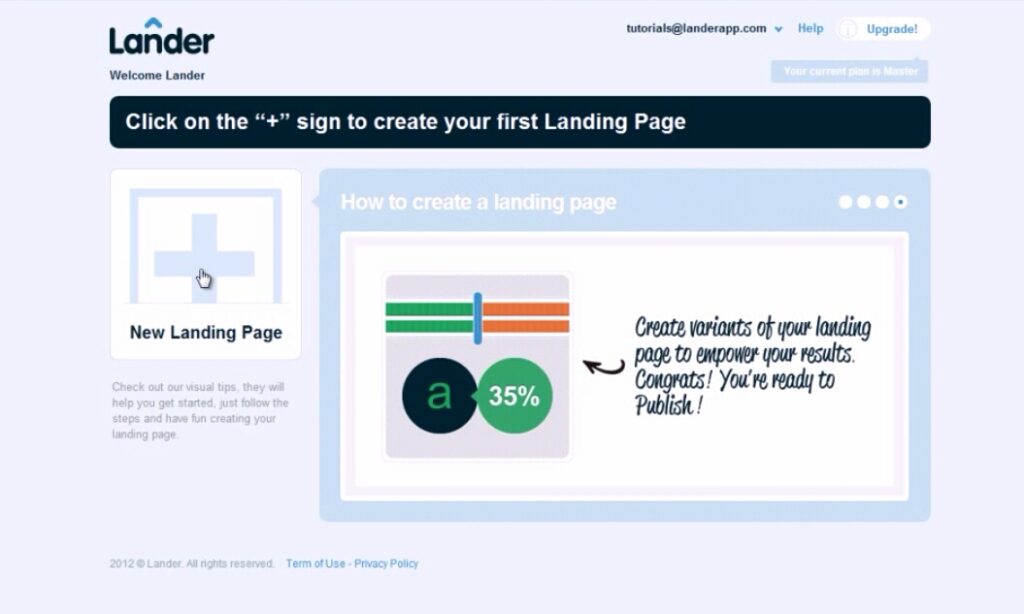
Enter the name of your landing page and click on the ‘Create’ button.
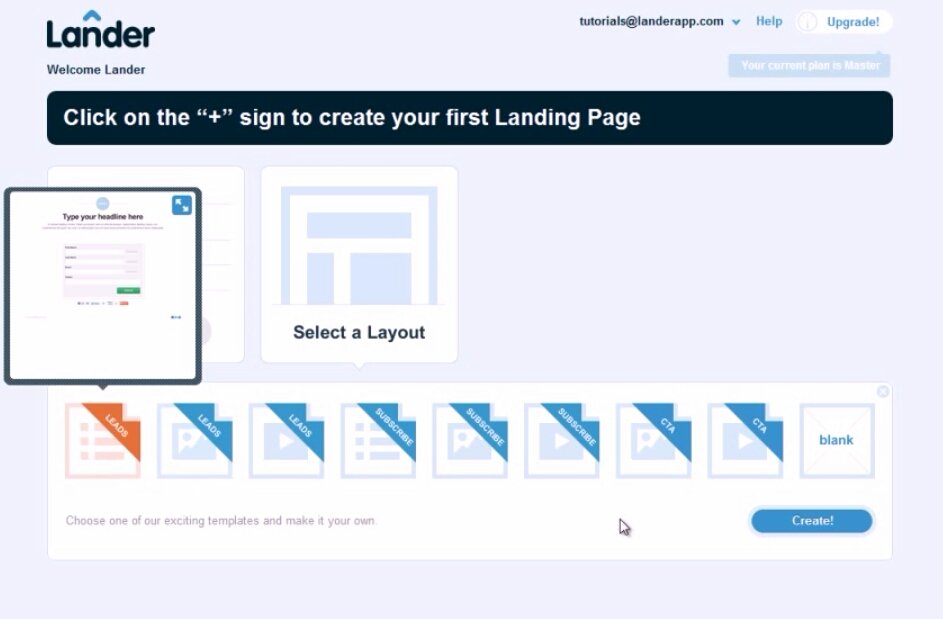
After that, you have to select your preferred layout. After selecting your layout, click on ‘Create’ below the layouts.
This brings you to the next page where you can edit the elements on your page. Double click on any element to edit it.
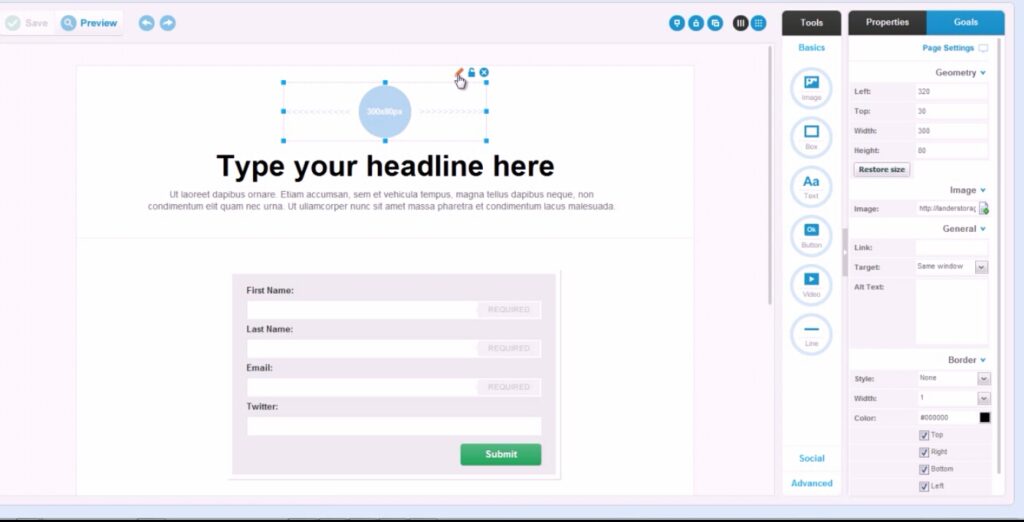
You can click on the logo at the top which will activate a popup where you can select an image you have used before or upload an image from your computer when you click on the ‘Browse’ button.
![]()
After that, edit the headline of the page and the text below it. You can select different fonts and styles suitable for you.

Add more element if it suits you with the drag and drop editor. You have your form where you can edit the fields. Click on save and click preview to see how your landing page looks like.
When you’re through with customizing your page, it’s time to upload to Facebook. If you have chosen one of the Facebook templates, then your page will have the recommended 810 * 800 resolution by Facebook.
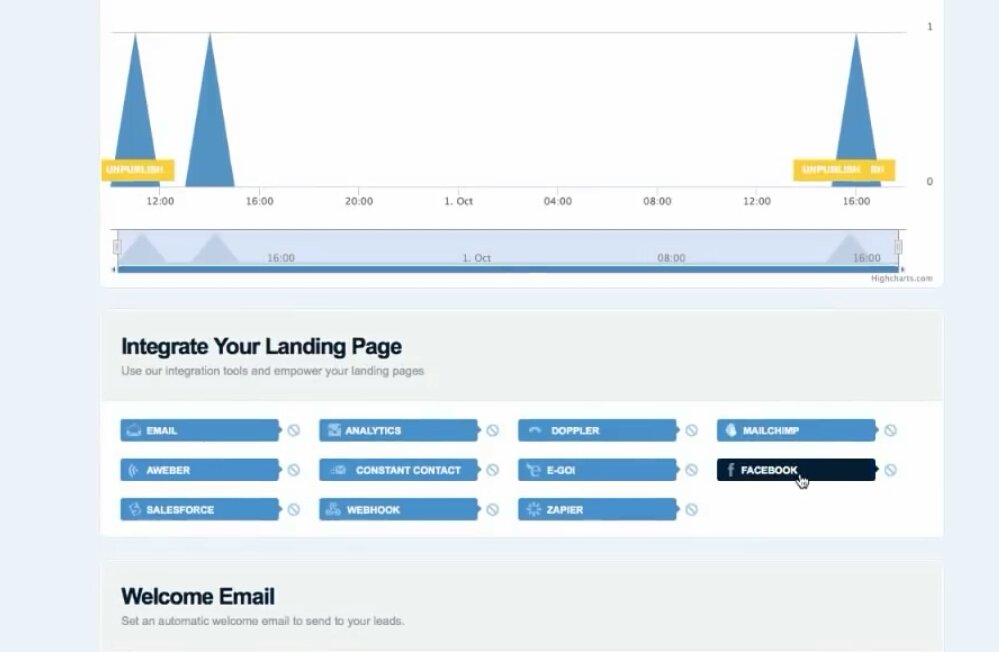
From your landing page dashboard, navigate to the integration section and click on Facebook. When you click on Facebook, you’ll be shown a window where you’ll be asked to integrate your Facebook account.
After connecting your account, you can select the fan page you want to publish your landing page.
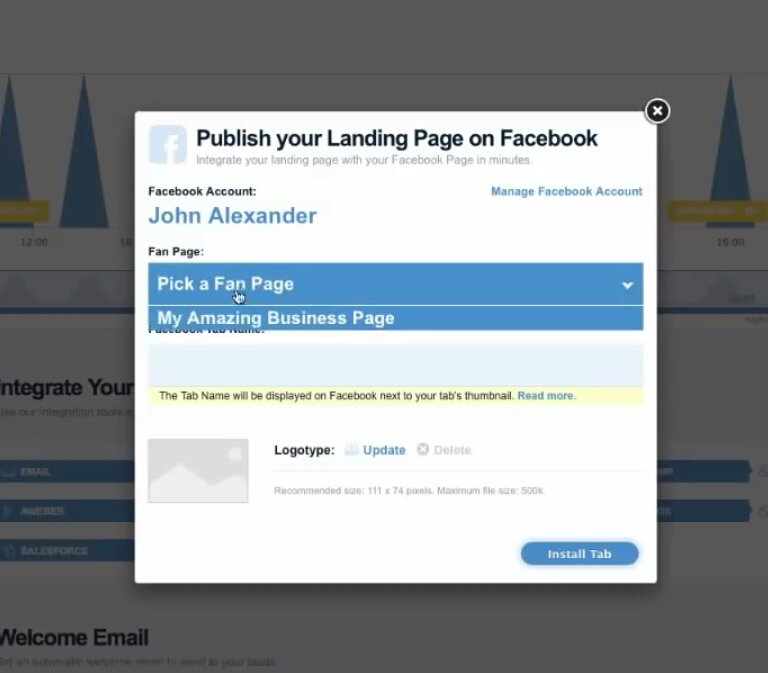
After this, enter the name of your Facebook tab. Upload an image that will be in your tab on the Facebook page. The recommended size for the image is 111 * 74 pixels.
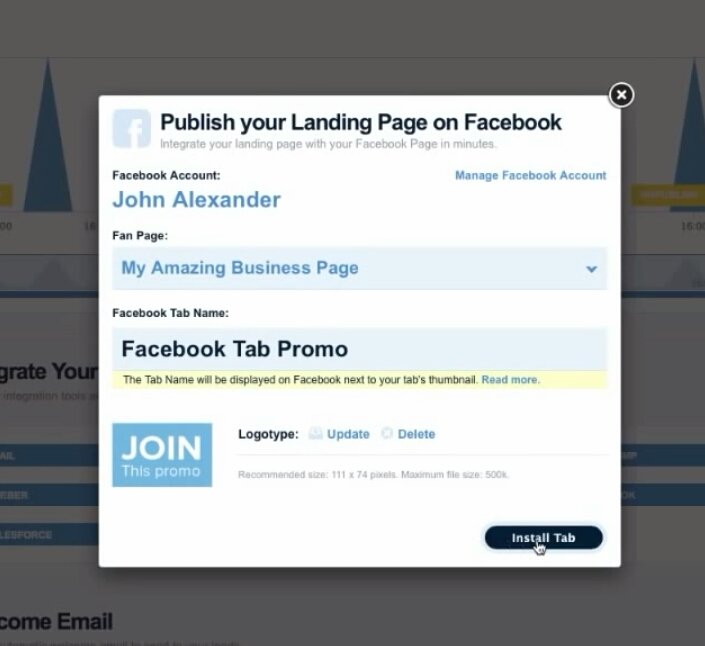
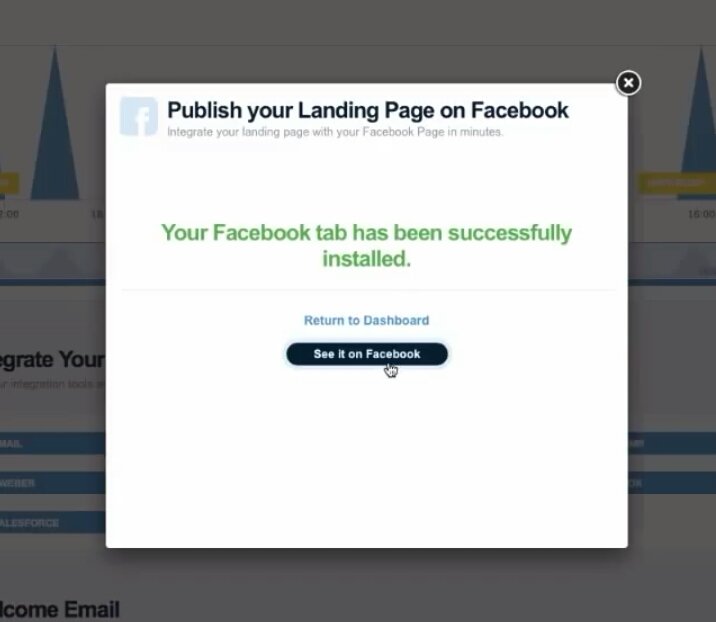
When you’re through with uploading your image, click on the ‘Install Tab’ button and the installation will begin. When the installation is complete, you have your landing page on Facebook. You can click on ‘See it on Facebook’ to confirm the page.
If you have no more use for your Facebook landing page, you can uninstall it. Go to your landing page dashboard on Lander and navigate to integrations. Click on Facebook and you’ll see the window you used to set up your page. Click on ‘Uninstall Tab’ to uninstall the page.
Landing pages on external websites
There are many platforms you can use to build your landing pages on external websites. We’ll consider the two below.
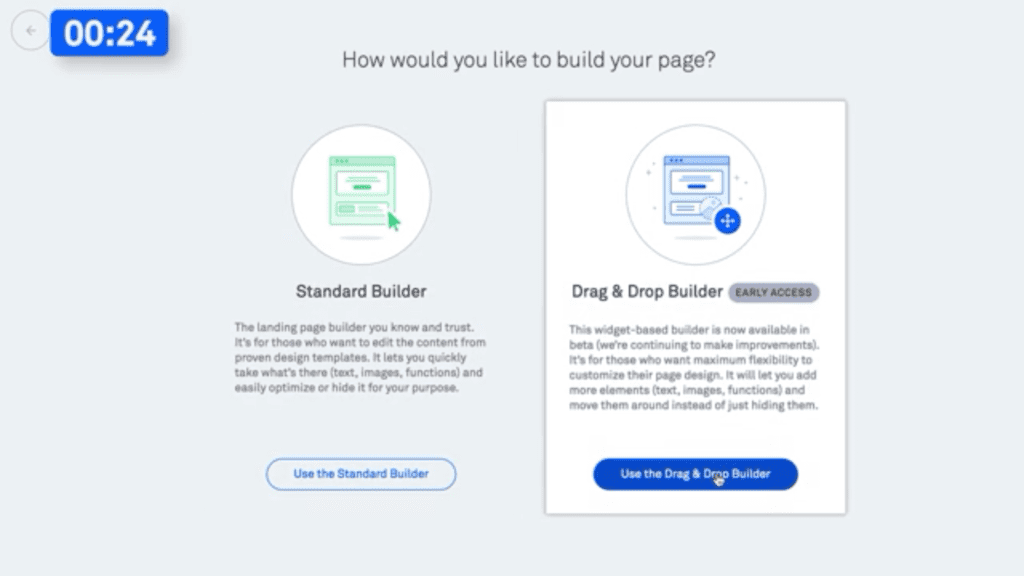
Build Facebook landing page on Leadpages
To create a landing page on Leadpages, log in to your Leadpages account. Navigate to the ‘Templates’ tab and click on it. This gives you a selection of templates you can use to build your pages according to your needs.
Select your template. You can also preview the template before you click on ‘Use Template.’

After this, you can choose to use either the standard builder or the drag and drop user. The drag and drop builder is easier to use and customize, so this is recommended.
You can add elements to your pages as you deem fit. You have to add the title and the text below your title. You can select the font size, color, type, and other details.
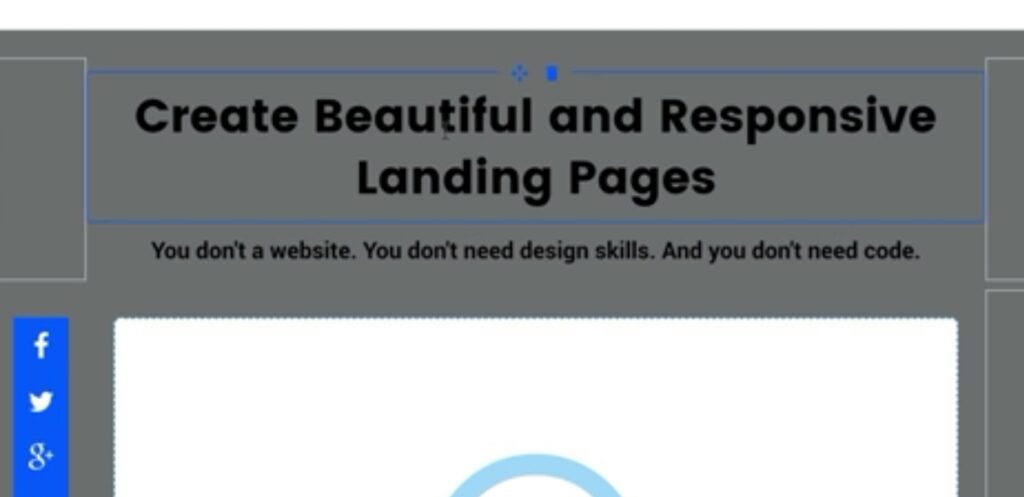
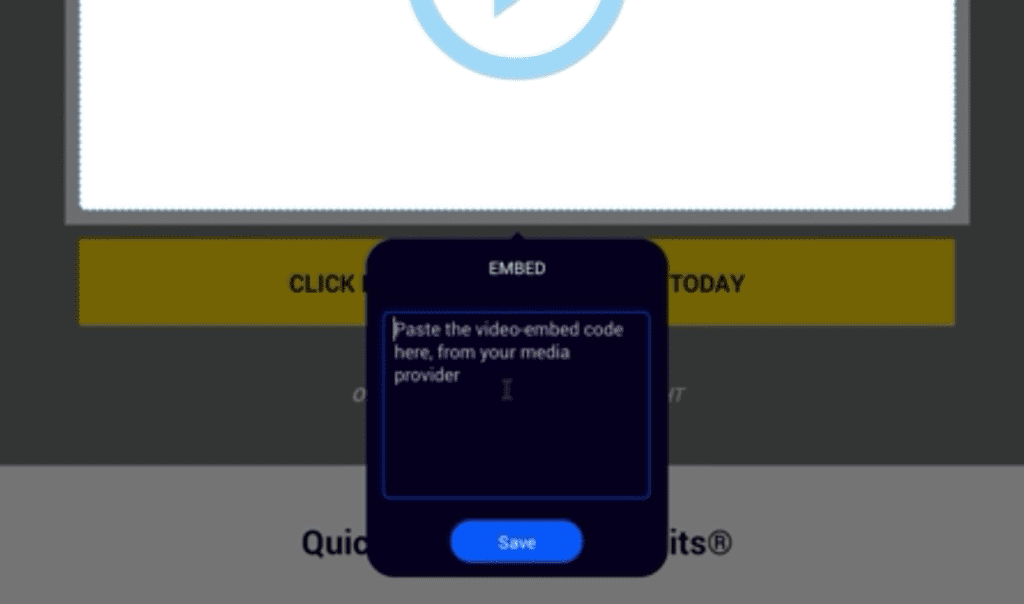
You can also change your social buttons to match your page. Upload your visual. You can add your image here and position it. In this particular template, which is for a video, you’ll embed the video URL.
After that, you can edit your call to action button. You have to select the color of the call to action button and the text that will display on it. The color of the call to action button has to stand out on your page and you should choose a text color that will be visible on the button.
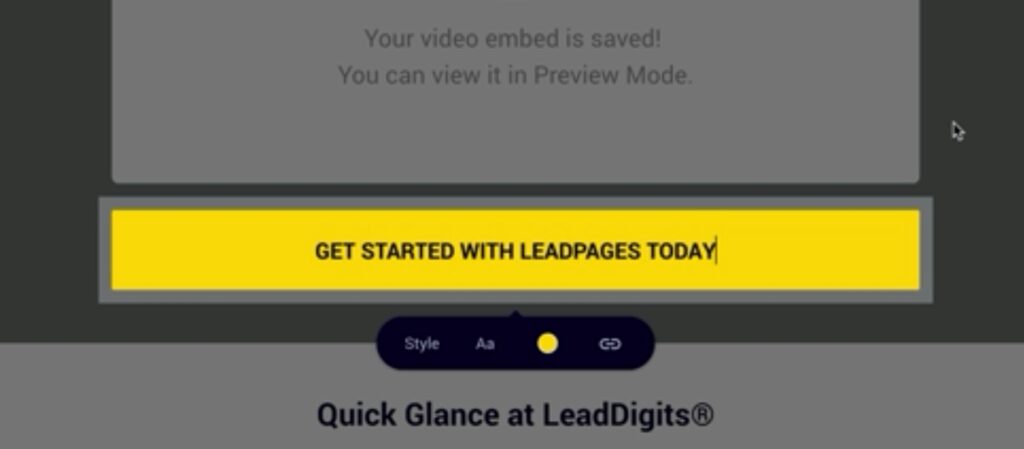
You can add more text below your call to action button to further convince readers that have not signed up yet. You can change the background color to blue and the text to white to give your page a better look and make the text visible.
Then you can add more images that relate to the product or service you’re talking about on your landing page. After this, you can add your call to action button. Another option is to add more text to the picture before adding the call to action button.

When you’re through with that, check if your call to action buttons are properly linked to your Leadbox which is the form you’ll use to capture your leads. Here, you can edit the title on the form, the call to action button, the form fields, etc. You must make sure that your form has the same theme with your landing page.
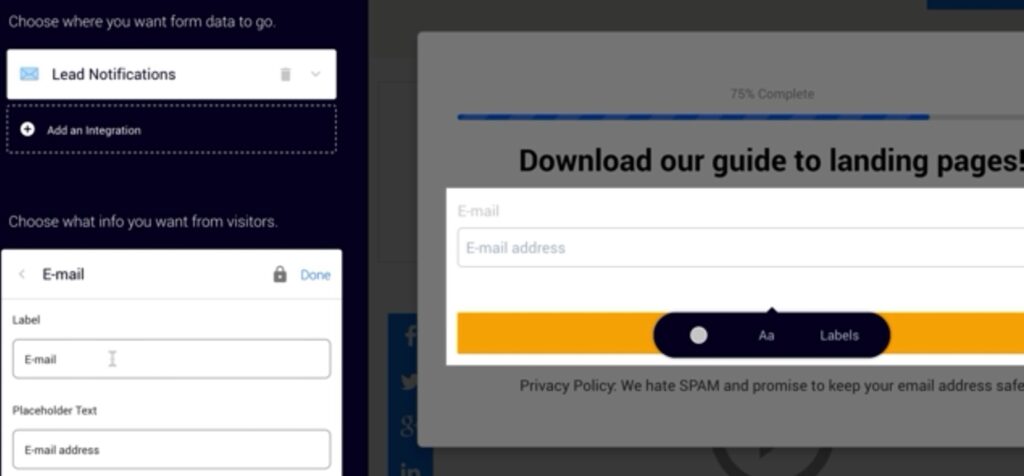
Then you have to connect your form to your email service provider as your leads will be sent there for further actions. Insert the address of your landing page which would be a page on your website.
Leadpages allows you to create Facebook ads from your landing page. When you publish your landing page there are 4 tabs in the publishing option. One of them is Facebook ads. When you click on this tab, you see a ‘Create Facebook Ad’ button. Click on this to create your ad.
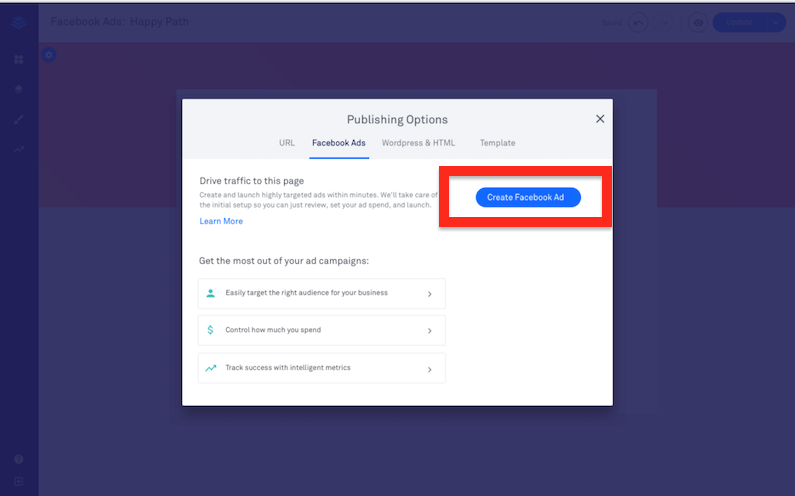
When you click on it, it extracts page elements like images, texts from your landing page. This is to ensure consistency between your Facebook Ad and your landing page.
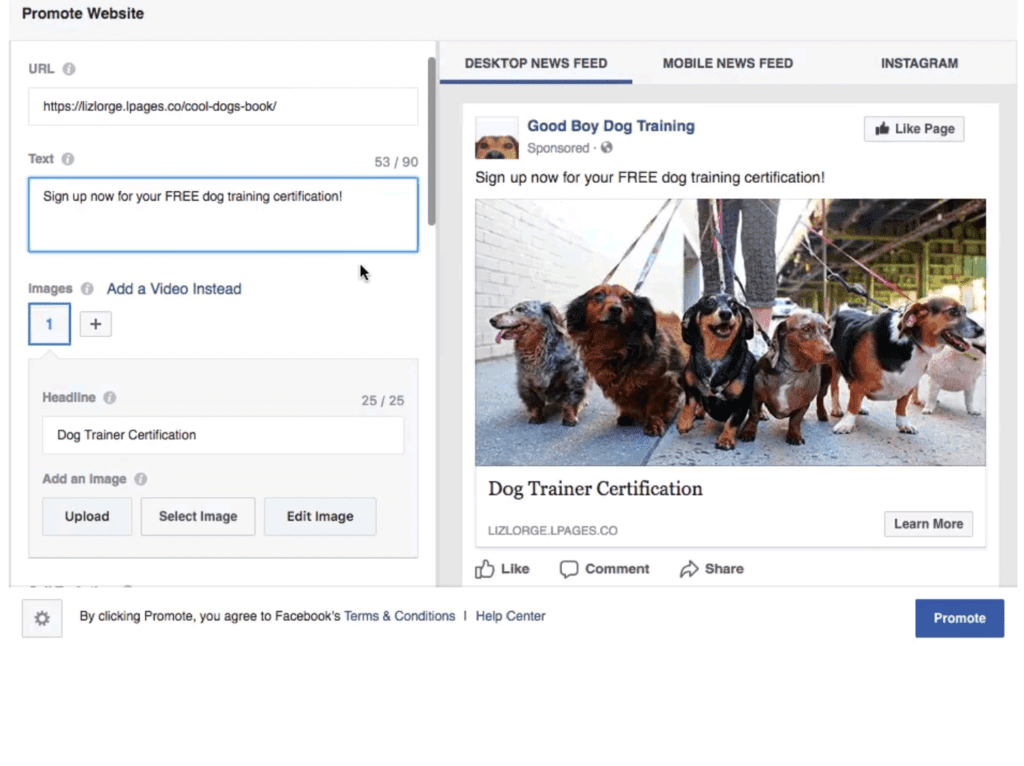
You can edit the elements on the page, insert your landing page URL, the text and headline to appear on your ad. You can also edit the desktop news feed view, the mobile news feed and the Instagram view to customize according to your needs on various devices. After this, you can click on ‘Promote’ to create your ad.
Build Facebook landing page on WordPress
If you want to build your landing page on your WordPress blog, an option is to use the ‘Elementor Page Builder’ plugin. When you build your landing page here, you can direct traffic to this page from your Facebook ad.
How do you go about it?
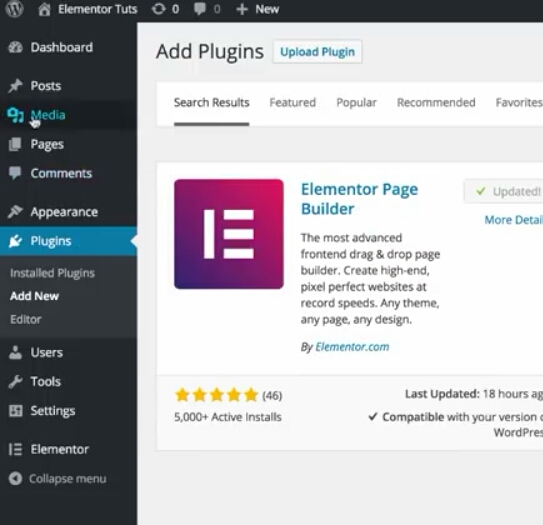
The first step is to click on ‘Plugins’ on your WordPress dashboard and click on ‘Add New.’ Search for ‘Elementor Page Builder’ and install it.
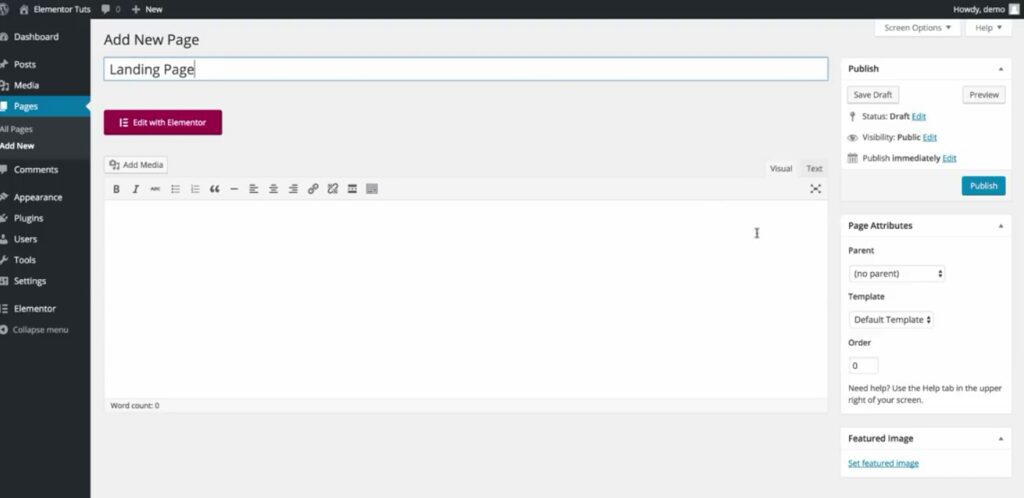
To create your page, navigate to pages on your WordPress dashboard and click for a new page. You’ll see the ‘Edit with Elementor’ button on your page. Click on this to start building your landing page.
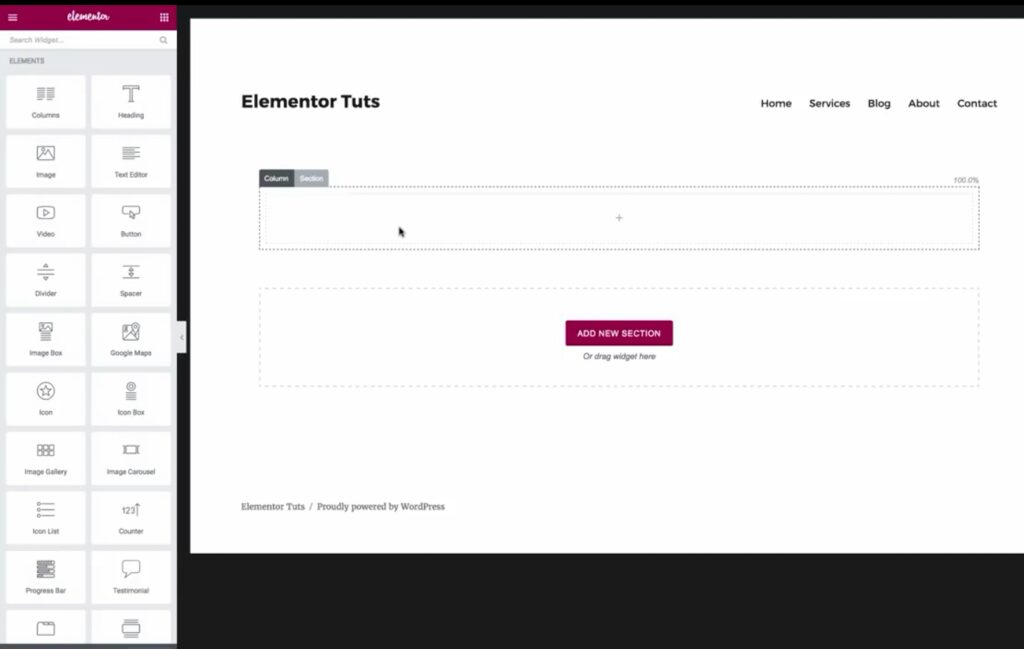
This leads you to a blank page and a left sidebar with tools you can use to add sections to your page.
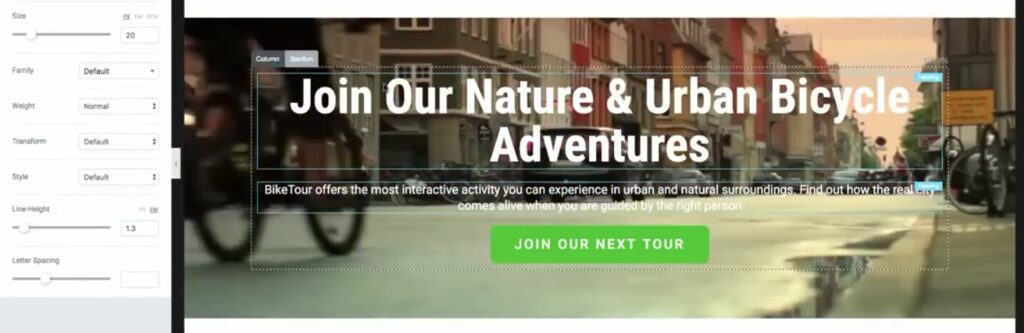
The first thing to do is to add text to your page. First, you have to add the headline, then text below your headline. You can adjust the size, color, and style of the fonts with headline naturally bigger than your text.
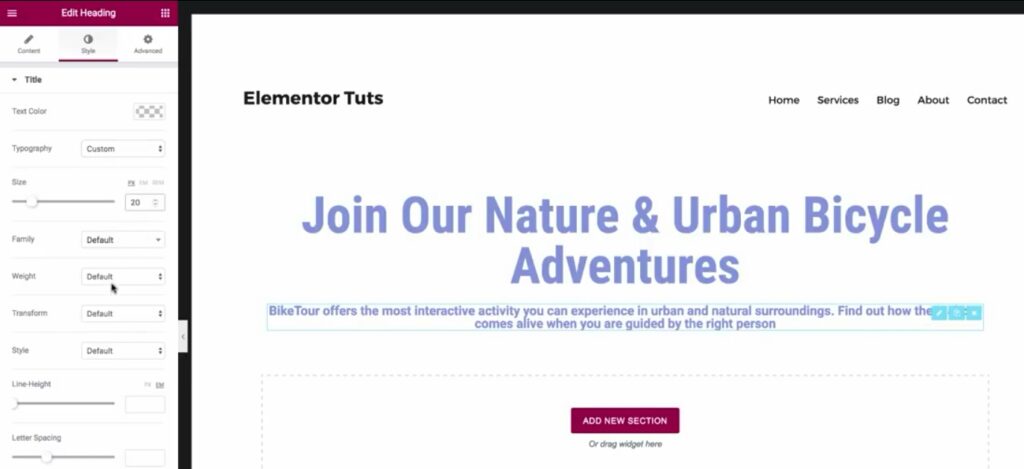
Add the call to action button below your text and edit the words in it. You can make the text capital to make it visible.
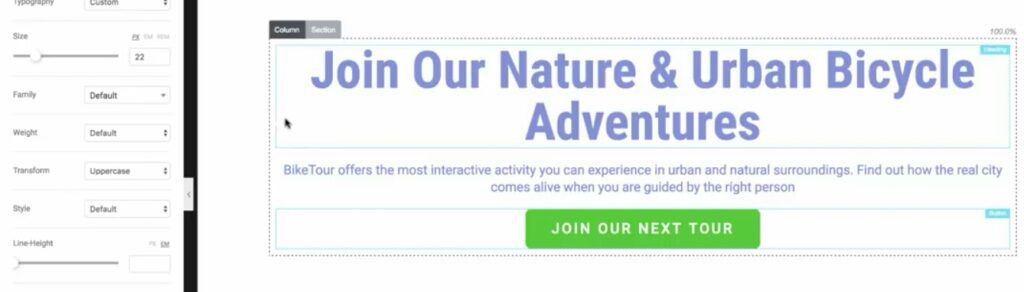
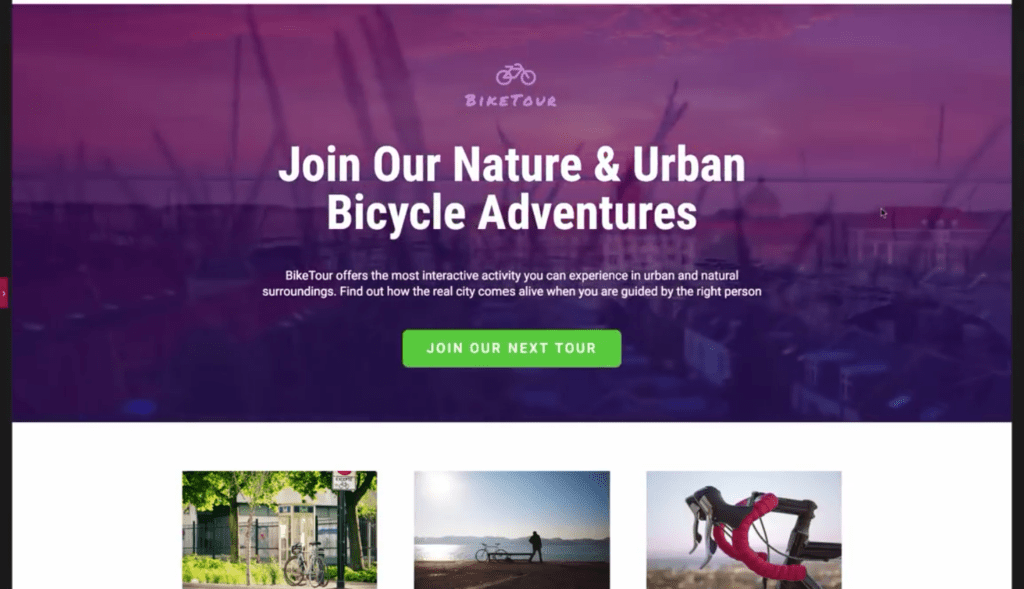
Upload your background. This could be an image but in this case, it’s a video. You can edit the size of your background to extend it further down the page. You can add an icon above your headline. In this case, a bicycle icon suits the content on the page.
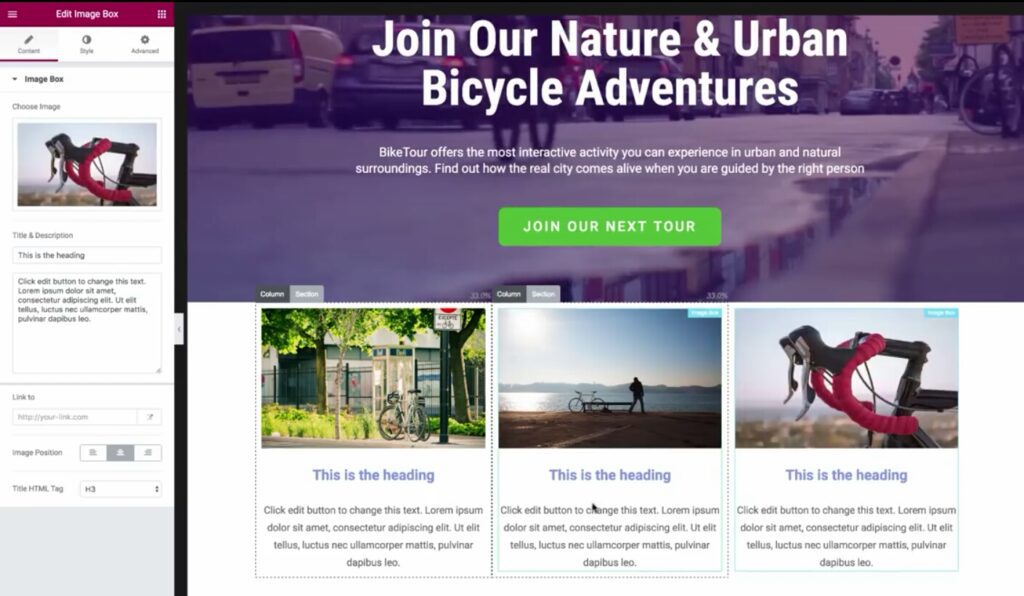
You can add another section below these. In this example, you have 3 columns where insert images and texts to go along with them.
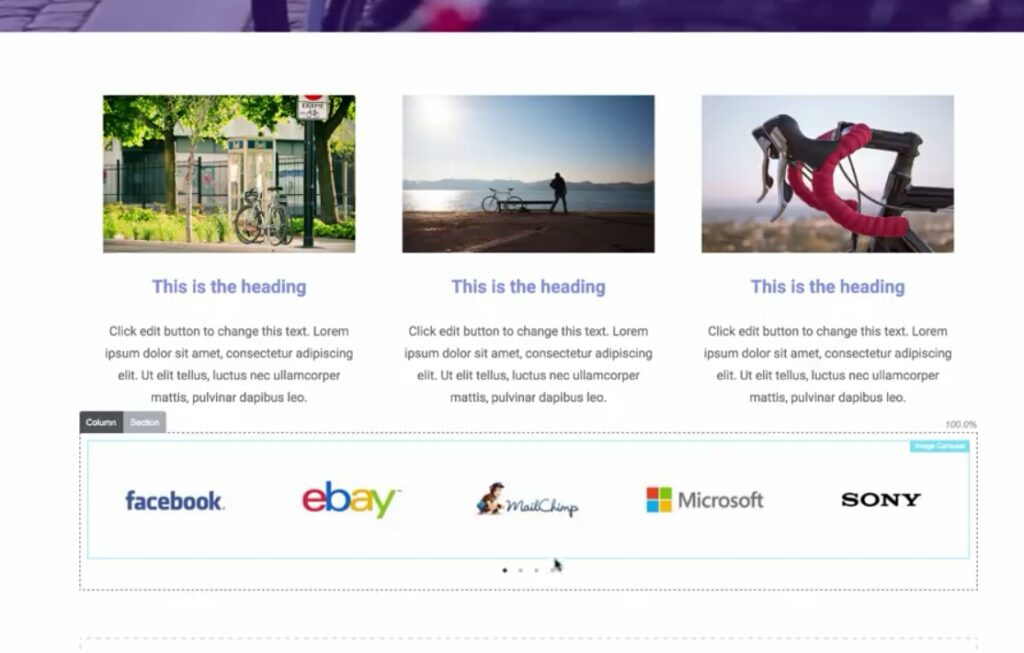
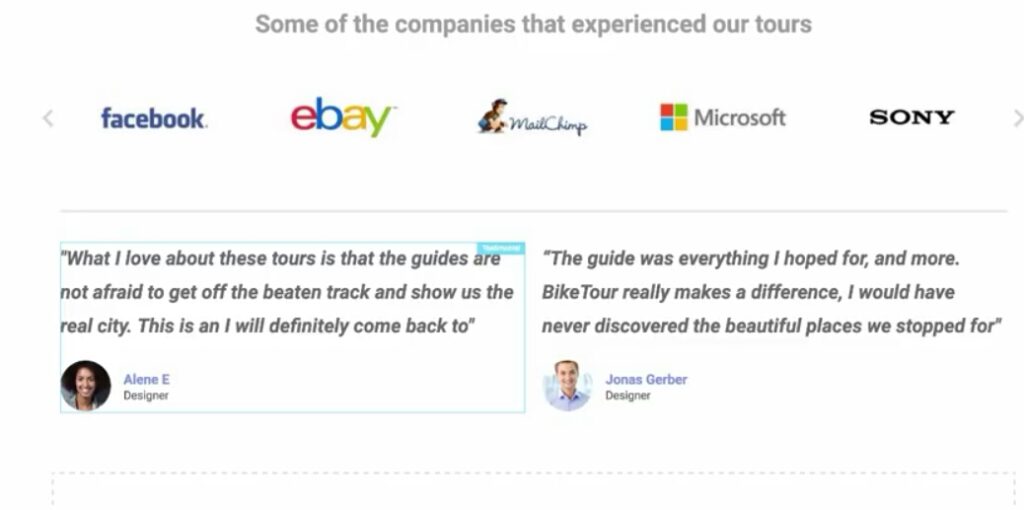
When you’re through editing that, you can add another section to display social proof. In this case, those are the companies that have experienced these tours. You upload the logo of these companies and add the text above it.
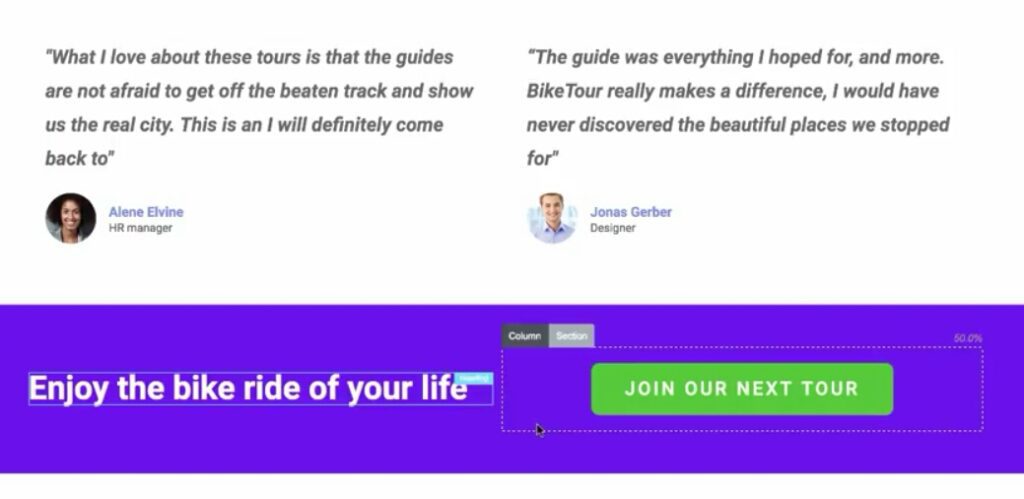
You can also add testimonials of people who have done business with you and gotten great results.
You can add another section which shows a short text and the call to action button. Provide a background for this section that will make your call to action button stand out.
Switch to preview mode to see how your page will look like when published. If you’re satisfied with this view, you can now publish your page.
To connect your landing page to your Facebook Ad, enter the address of this landing page in the website URL your ad will click to.
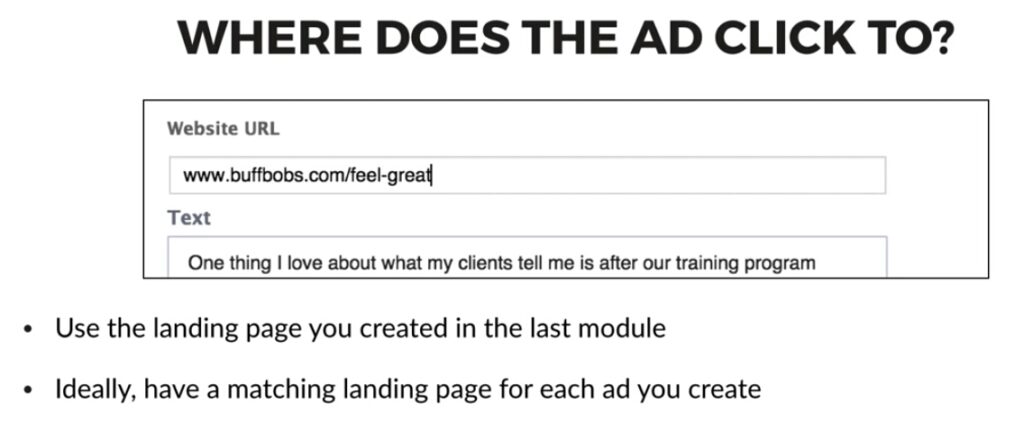
While building your ad, you must make sure that images and text on your landing page appear on your ad too to create similarity.
Facebook Lead Ads
This advertising option gives you the opportunity to capture your leads when they click on your ads. This could make the process faster and easier as the user doesn’t have to leave Facebook to enter their details.
To create your Facebook Lead ads, you have to follow the steps of creating a normal ad on Facebook.
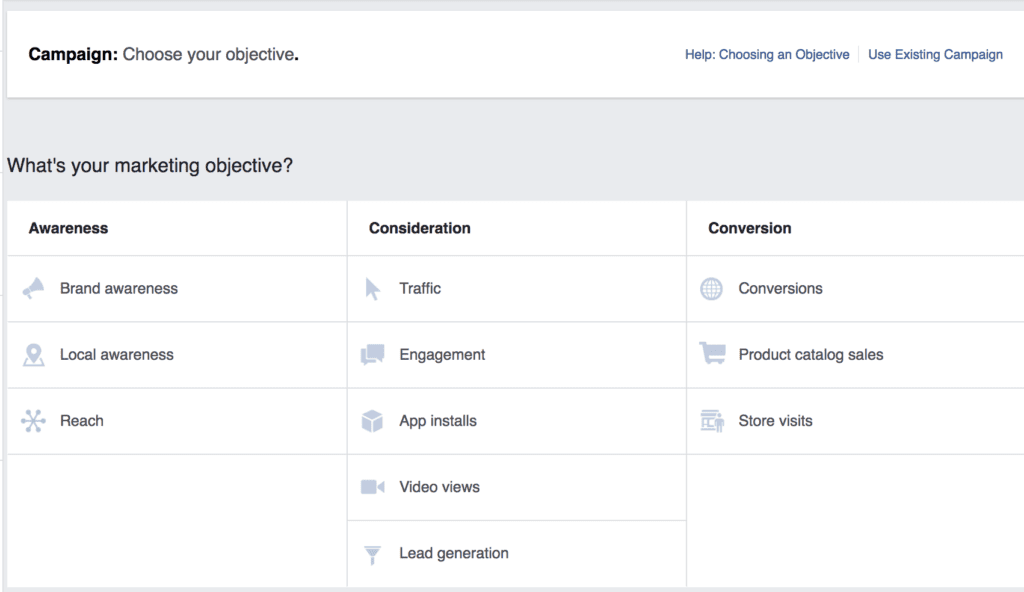
Go to the Ads Manager or power editor and select ‘Create Ad’ or ‘Create Campaign’ respectively.

You’ll be asked for your ad campaign objective. Click on ‘lead generation’ to continue.
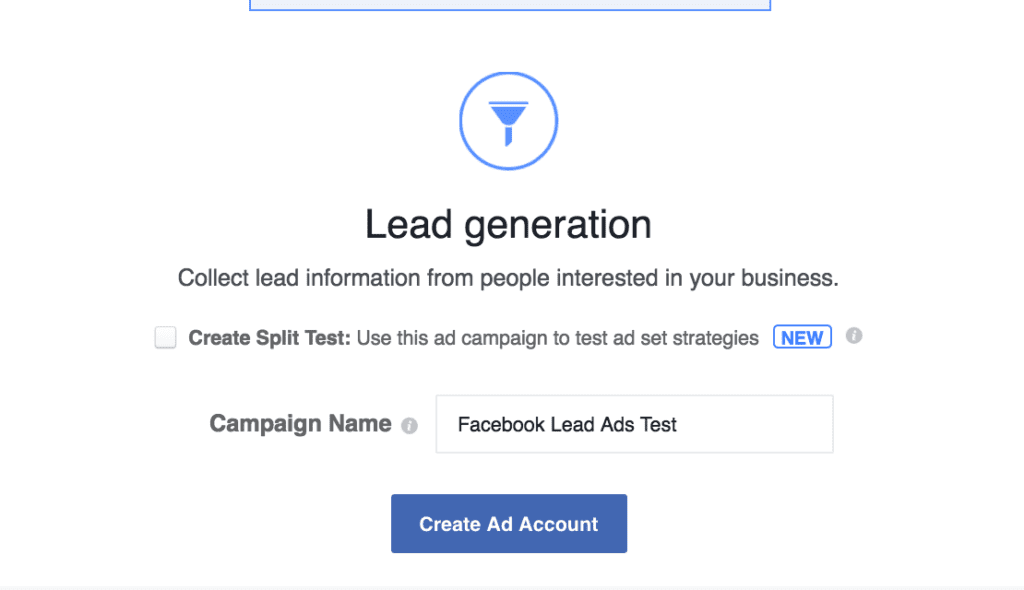
Enter the name of your ad campaign.
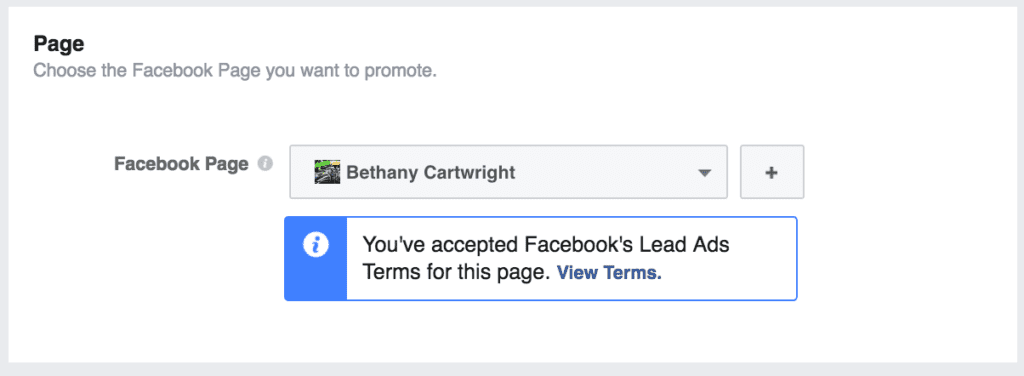
You can then set the details of your account like country, time zone, and ad unit currency. After that, select your Facebook page for the campaign.
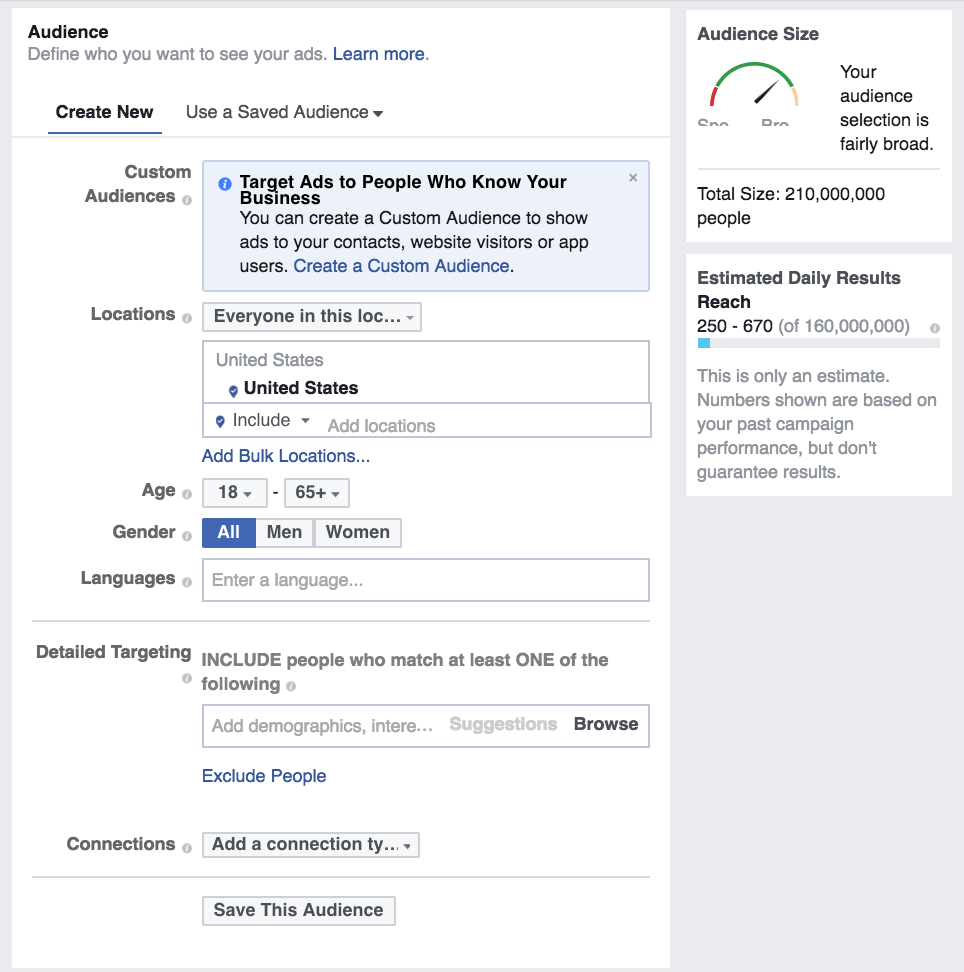
Next, you have to select the user demographics for the ad. Here you can specify age, gender, location and other important details.
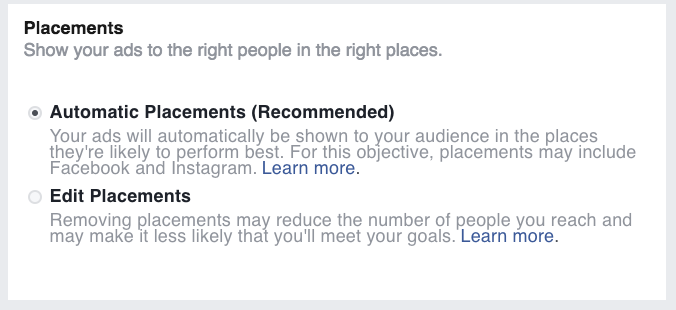
The next step is to select your ad placement. You can either select automatic placement where Facebook decides the best position for your ad or you can edit placement to decide where to place it.
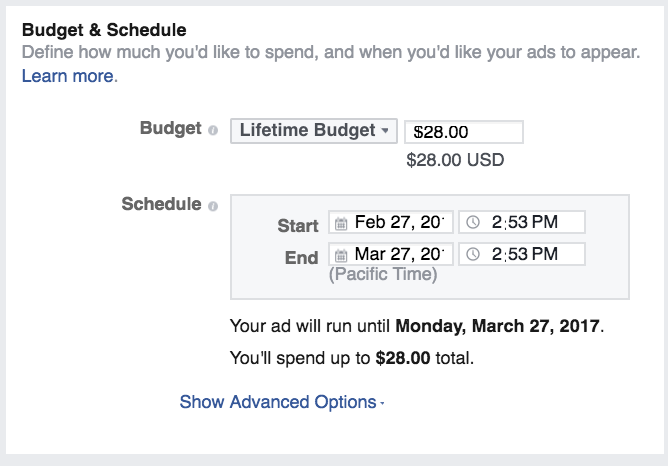
Then you set your budget for your ad.
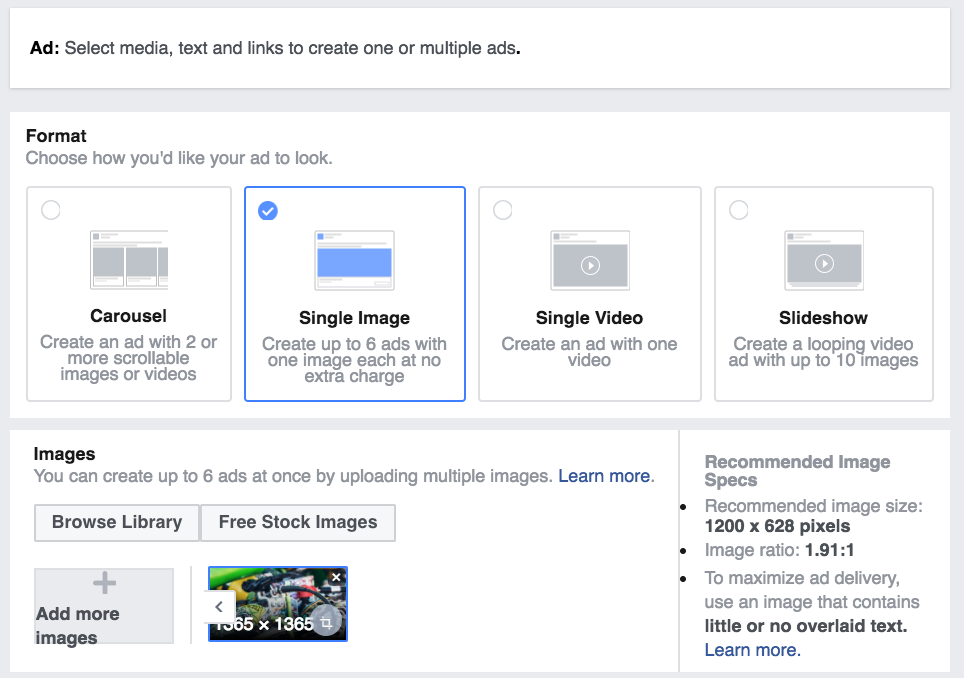
Select the ad layout you want to use. You can also upload your image below the layouts.
On your next page, you can edit the headline of your ad, the description and the text on the ad. You have to note that this is your only opportunity to convince your viewers as they are not visiting your landing page.
Make your offer as clear as possible so that users know what they are getting when they click on your call to action button. There are 6 call to action buttons which includes:
- Apply Now
- Download
- Get Quote
- Learn More
- Sign Up
- Subscribe
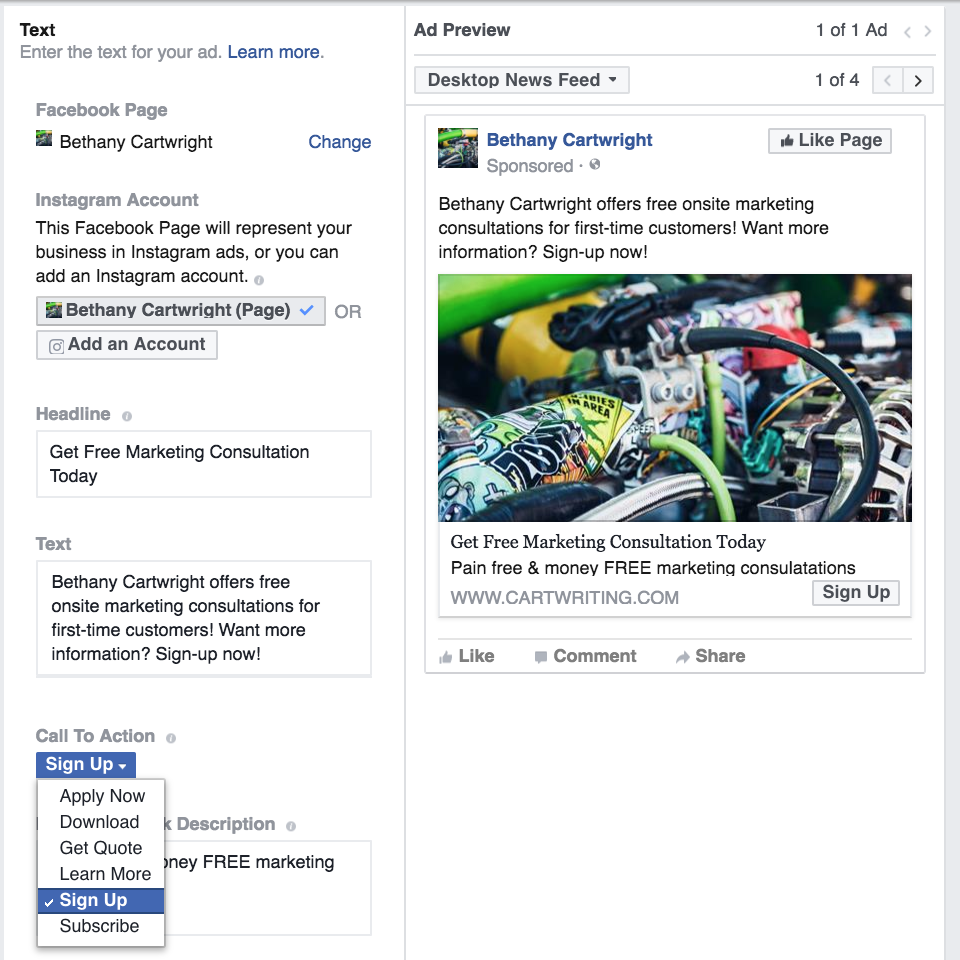
You can choose any of these as it applies to your offer. The next thing is to choose the questions you’ll ask your viewers. The key is to ask a few questions as possible. The more your questions, the more your click-through rate suffers.
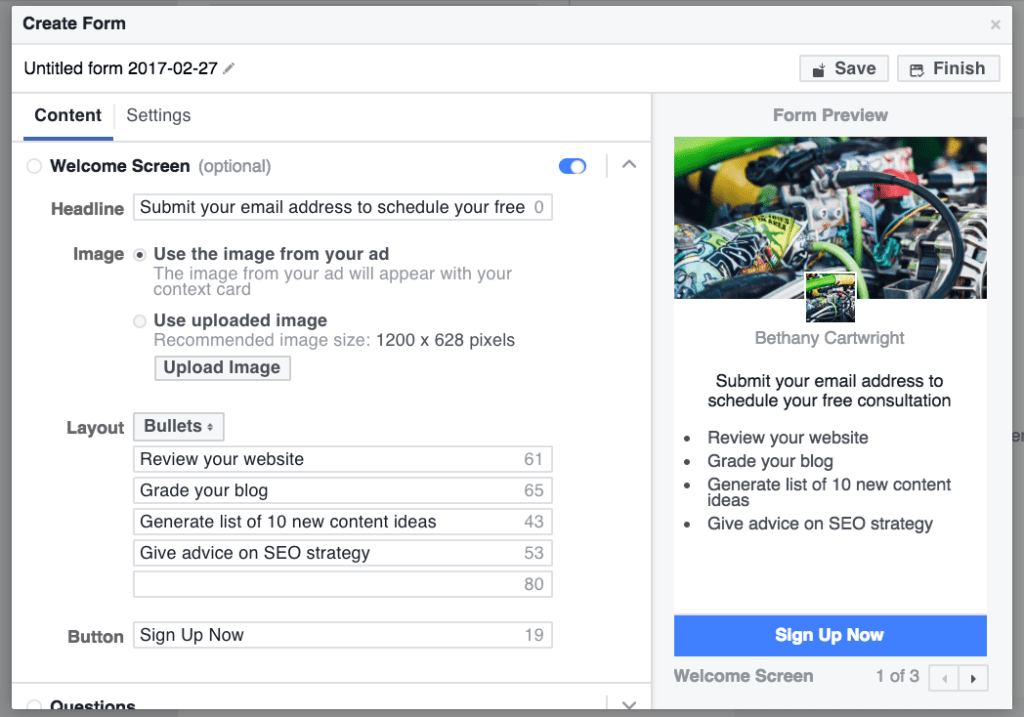
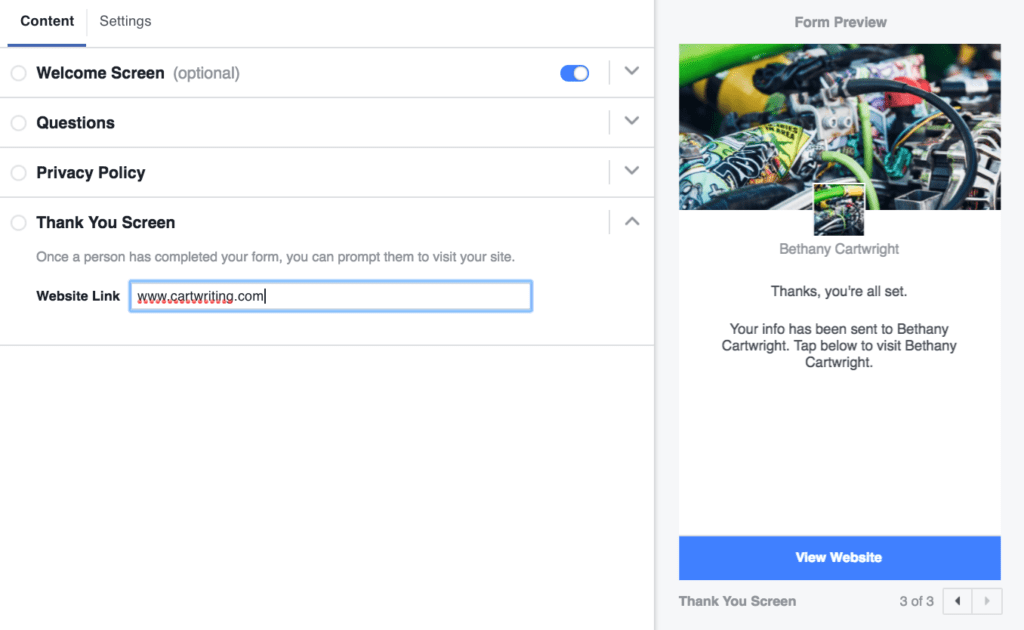
The next step is to set the privacy policy of your website by entering the link text and the link URL of the page. Then you set your ‘Thank You Screen’ which displays to anybody who has entered their information. You can include a link like ‘View Website’ below your thank you screen where users can click to visit your website.
Check your ad to confirm that every detail is in order. Click ‘finish’ to save your form. You can also use the ‘select a CRM’ option to collect the information you’ll receive from your leads. The last step is to select the ‘Place Order’ button.
Write your copy
Your copy is one of the most important elements of your landing page. What are the things you must have in mind when drafting the copy for your landing page?
Compelling headline: the headline is the first part of your landing page. Your headline must reveal your unique selling proposition before visitors continue to read your copy. This gives them a picture of what to expect.
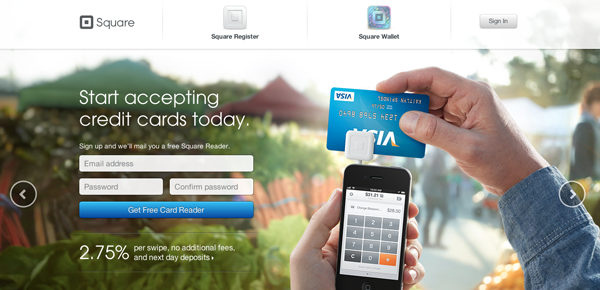
Value proposition: why would anybody want to release their personal information to you? Well, there is no reason and if you don’t give them a concrete reason, they won’t sign up. Your value proposition must always talk about the benefit your readers will gain. Your benefit must be good enough to prompt them to give you their information. For instance, this Square landing page shows clear benefits to potential leads before they sign up.
Call to action: the call to action on your copy must be consistent and if possible, be limited to a single call. You can’t tell visitors to get your ebook, then get your video, then get exclusive access to your content on the same page.
This becomes confusing and you end up losing leads. Pick a single call to action. According to Wishpond, landing pages with multiple offers get 266% fewer leads than single offer pages.
Best practices for building a landing page for Facebook
What are the things you must make sure are in place to give your landing page the best chance for conversion?
Make the ad and landing page congruent: to build a landing page that capture leads for your business, the image on your ad must be consistent with the one on your landing page. Also, the text on your ad should also appear on your landing page.
This creates consistency for your viewers. It’s bad for your conversion if Facebook users click on your ad and it leads them to a landing page that looks totally different.
For instance, look at the image on ClearlyContacts on their Facebook ad.

And their landing page.
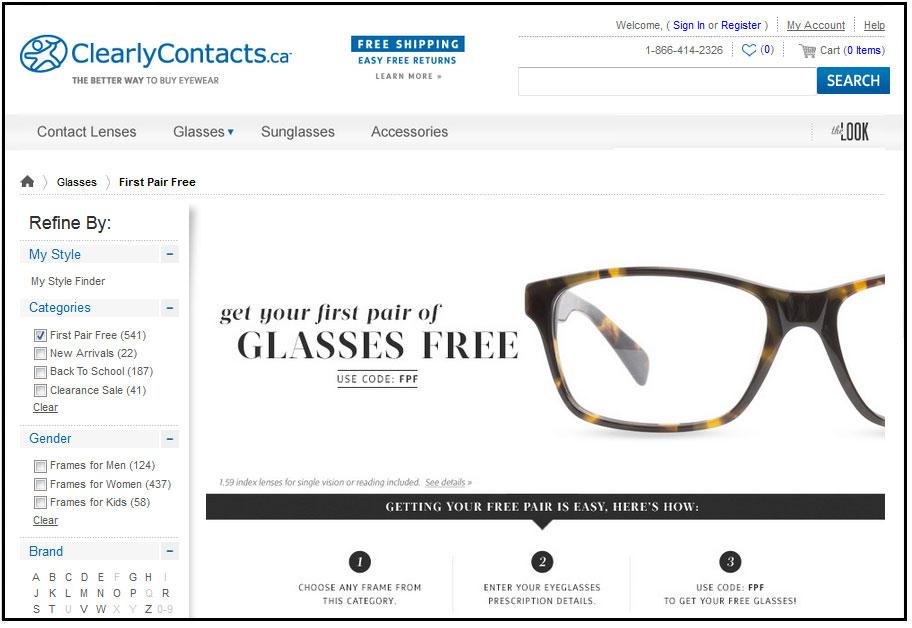
You can see that they used the same image and words like ‘Free’ and ‘glasses’ appear in both.
Include an image of a person: people can connect better when they see a human picture in your ad. It gives your ad a human feel which they can connect to. It has been proven that the image of a smiling woman gives the best result in an ad. Adweek claims that 70% of clicks you get on a Facebook ad is determined by your ad image.
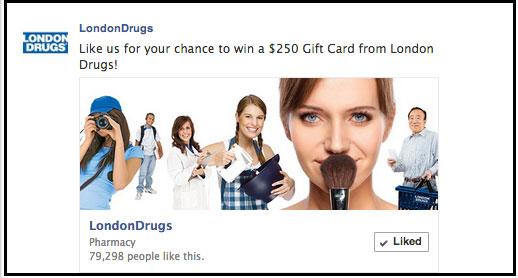
This is an ad by LondonDrugs where they have 6 people including 3 smiling women.
Add videos: people are able to process videos faster than plain text. In fact, having videos on your landing page can increase your conversions by 86%.
Minimize the number of fields to as few as possible: Fewer fields improve conversion. According to Formstack, reducing the number of form fields to 4 or below increases conversions by 160%. Even a decrease from 4 to 3 fields improve conversion by 50%!
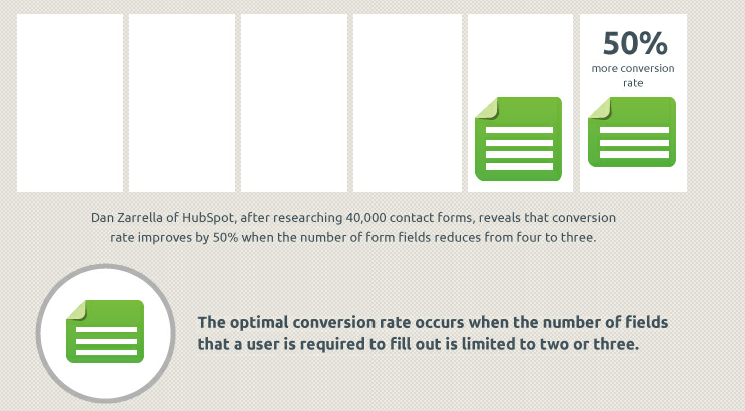
In some cases, 2 may be enough while some will need 5. You have to make sure you’re asking for information you need. And you have to know your probable audience. For instance, a marketer representing their company will have no issues filling 5 form fields. However, a millennial who is your potential customer may lack the patience to do this and just bounce off your page.
Use an attractive color for your CTA button: the color of your call to action button must never blend with the content on your page. It is advisable to use a color that stands out on your page and has not appeared anywhere else.

Make your page mobile responsive: more than half of Facebook’s monthly users (56.5% and 1.055 billion users) access Facebook from only their mobile devices. If your landing page is not mobile responsive, it means you’re losing half of your leads before you even begin.
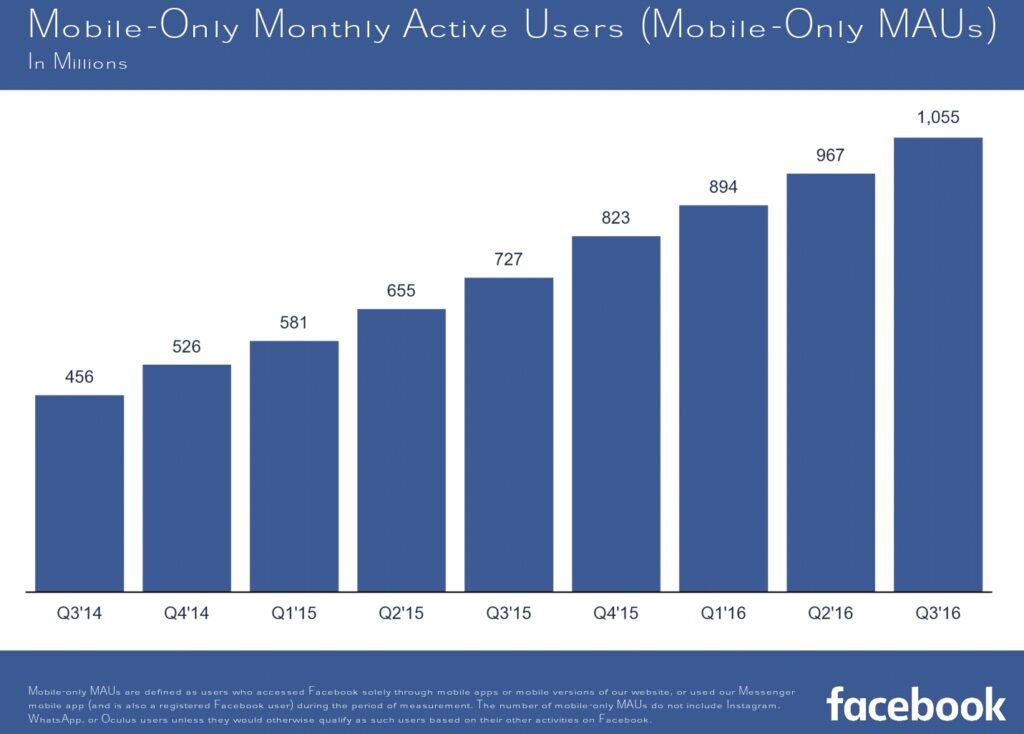
When you also consider that 89% of Facebook Advertising Revenue comes from mobile advertising, you’ll see that mobile is an integral part of your Facebook advertising. However, according to a survey by Adobe, less than half of respondents claim their company has a mobile-optimized website.
Below is the Facebook ad by SundanceNow Doc Club.

This is the mobile version of their landing page.

You’ll see that this page still have all the features needed on mobile.
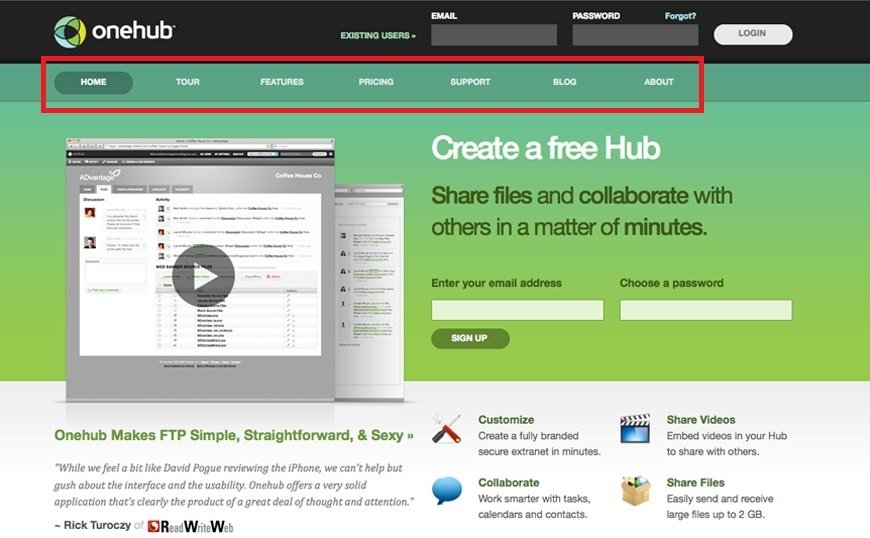
Remove the navigation bar: you must give your viewers as few distractions as possible. This is because the main aim of your landing page is to capture leads. Your navigation bar makes it easy to leave that page before they even check your content. Remove your navigation bar to keep them focused on your goal.
Conclusion
Building an effective landing page is not rocket science. But it requires you to understand your potential customers, identify their needs, and convince them you can meet those needs.
If you can do this on your landing page, then your potential leads will be willing to offer their information to you.
There is a big audience for your business on Facebook, no matter which type of business. Getting them as your leads is the main way you have to turn them into customers.
Gaining as many leads as possible from Facebook is the only way you can justify your Facebook Ad Spend.