



For the last two years, healthcare marketers have asked me some version of the same question: how do we influence what ChatGPT says about us? Patients ask it where to get care, which clinic takes their insurance, and which location is closest. The answers came from wherever ChatGPT could find them—an old directory listing, a location you closed two years ago, a parent system’s website. There was no front door. You could strengthen your content, clean up your citations, and hope for the best.
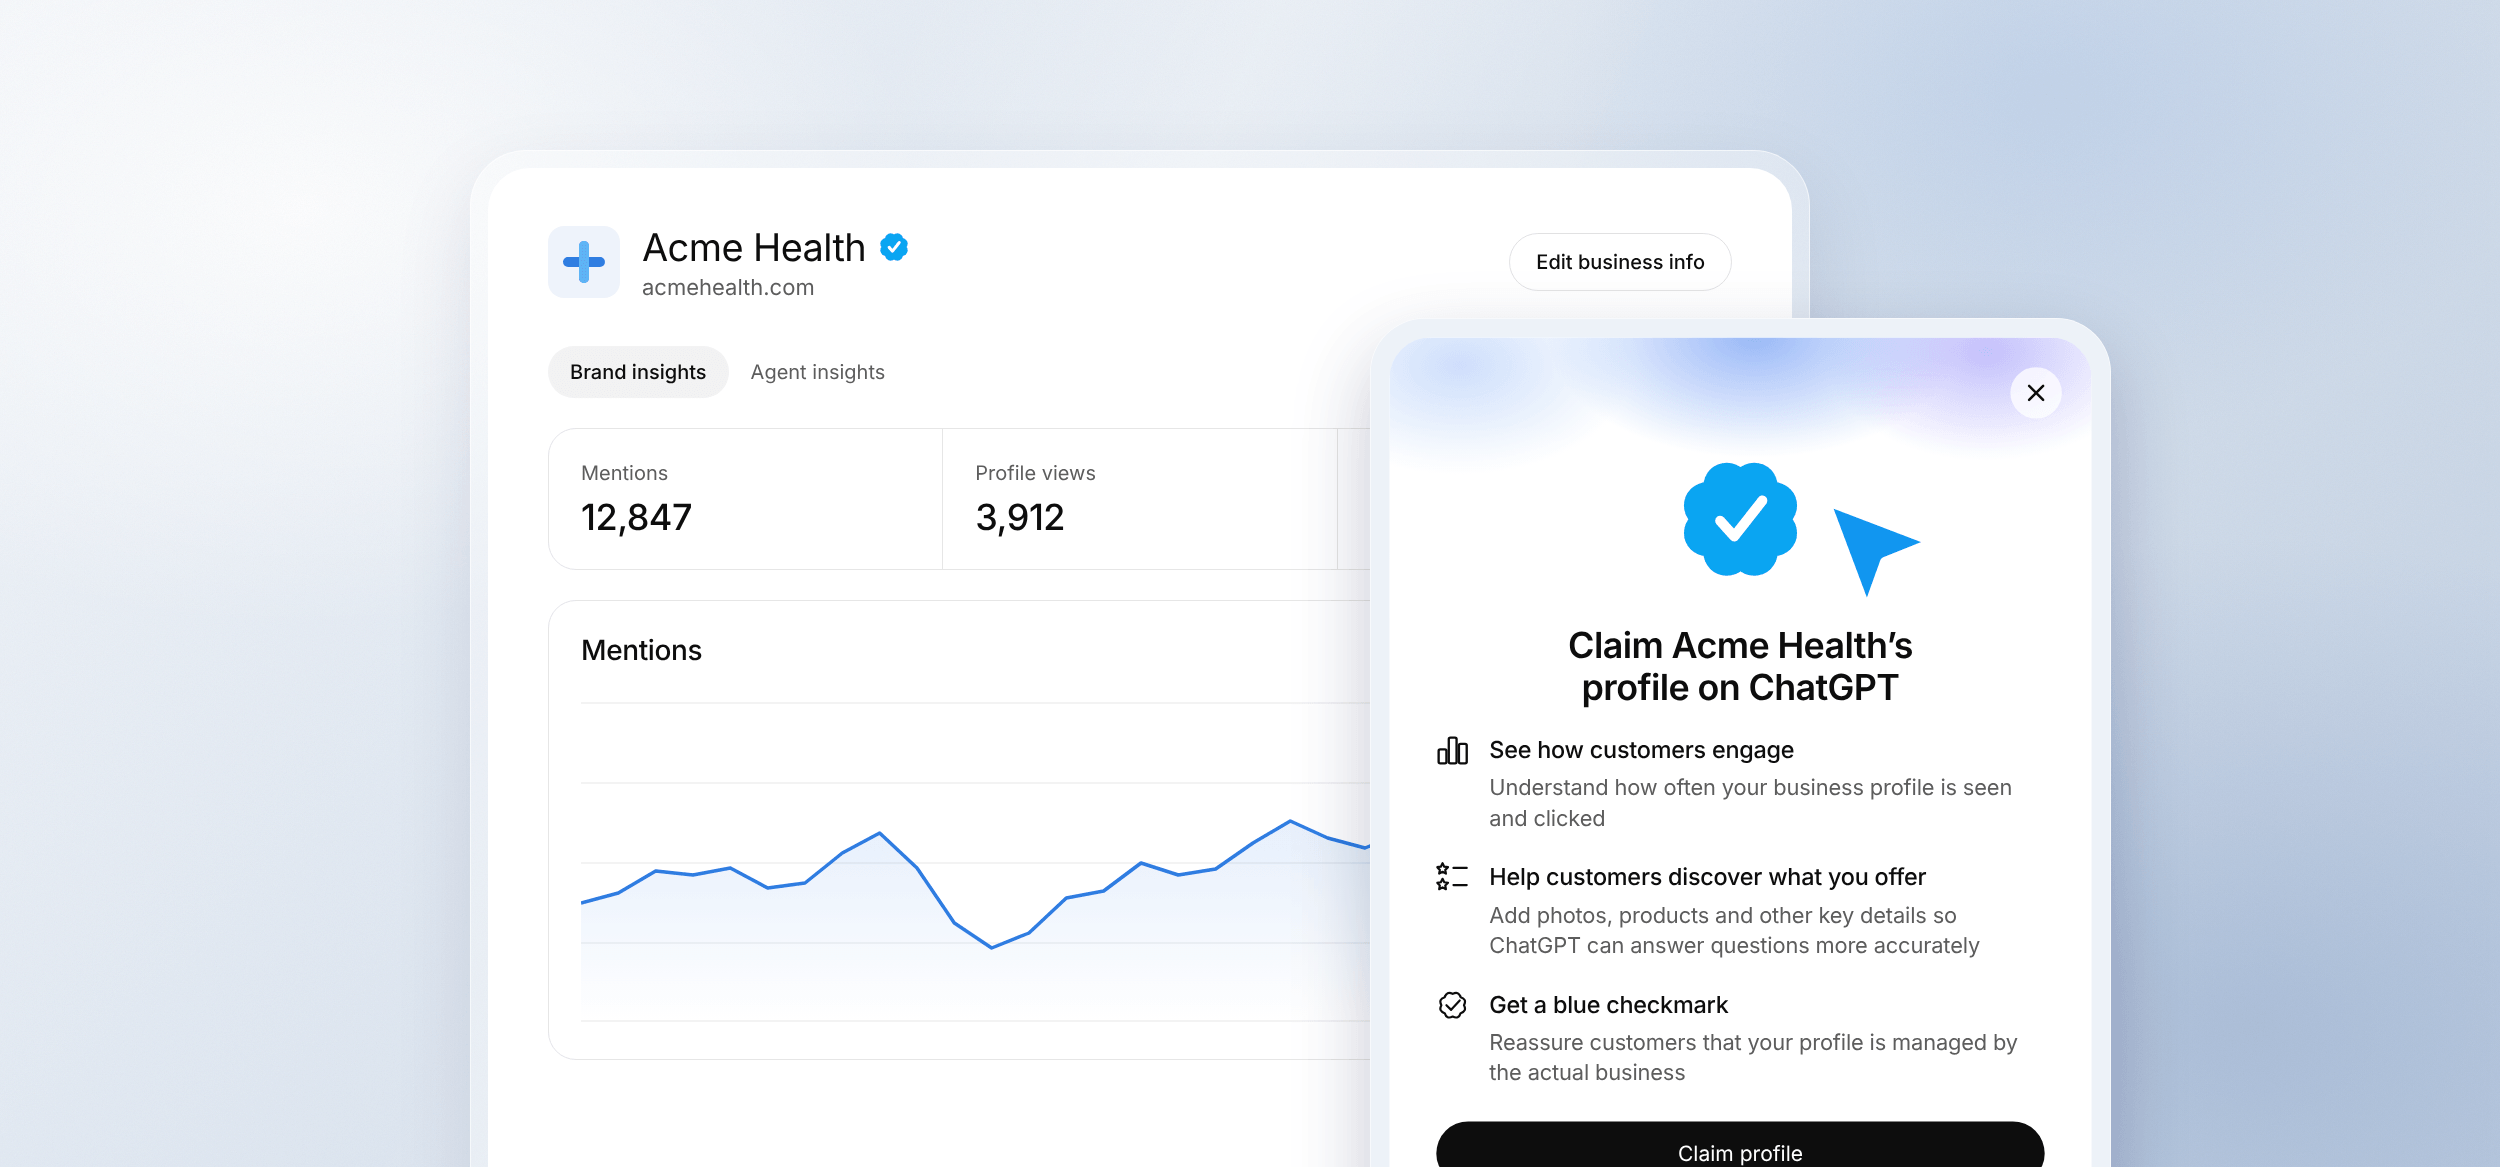
That changed on November 10. OpenAI launched Businesses in ChatGPT in beta, which lets organizations claim their listing through a new Business Hub, correct the information ChatGPT uses about them, and see how often they’re mentioned. For healthcare organizations, it’s the first direct line into a platform OpenAI says reaches 1.2 billion people every week.
Why this matters for healthcare organizations
I’ve talked about this a lot: AI tools have become recommendation engines, and they reward brands that give them clear, consistent signals. Your website is still the strongest of those signals. Claiming your listing gives you a direct line into ChatGPT, so you can manage the details it shares about your practice.
Once your practice is verified, you get three things:
- Visibility. A dashboard shows how often your practice is mentioned in ChatGPT, along with profile views and website clicks. For most teams, this is the first hard data on AI-driven discovery.
- Accuracy. You can correct addresses, hours, services, and contact details so patients aren’t sent to a closed or relocated location. For multi-site groups that have moved, merged, or rebranded, this alone is worth the effort.
- A front-desk assistant. OpenAI is also rolling out business agents that answer common questions inside ChatGPT using context you provide. Availability is limited during the beta, and in healthcare, an agent needs the same guardrails as your front desk.
One caveat: OpenAI says claiming a listing doesn’t guarantee better placement. The value is accuracy, insight, and control. Your broader AI visibility work, including content, structured data, reviews, and consistent listings across Google and directories, still does the heavy lifting.
Why we recommend website domain verification
OpenAI’s default verification sends a code by text or phone call to the number on your listing. In healthcare, that number usually routes to a call center, phone tree, central scheduling team, or after-hours answering service. The code never reaches the person at the keyboard, and most main lines can’t receive texts anyway.
The reliable option is website domain verification. You add one small TXT record to your website’s DNS settings. It’s invisible to patients and has no effect on your website, email, patient portal, or online scheduling.
The exception: a direct line that a person answers
If the number on your listing rings straight to a staffed desk, which is common for single-location practices, the phone option works and skips DNS entirely. If you need to bypass a phone tree, do it outside clinic hours and forward the line to a staffed phone so no patient calls are missed.
- Agree on who will answer.
- Turn off the phone tree so the main line rings through.
- In ChatGPT, choose Business phone and request the code by phone call.
- Have the person who answers read the code to whoever is at the computer.
- Turn the phone tree back on right away.
The whole window takes about five minutes.
Before you start: line up the right people
The hands-on setup is quick. Getting there can take longer. In most healthcare organizations, a DNS change needs sign-off from IT, and sometimes from compliance or security. Health systems often run these requests through a formal change process with its own timeline, so start those conversations early.
What you need
- A ChatGPT work account for the person who will own the listing, set up with your organization’s email. A personal account means the listing can leave with an employee.
- Access to your DNS settings, or a contact in IT or at your web vendor who has it.
- A government-issued photo ID for the person claiming. OpenAI may also ask for business registration information and proof that you’re authorized to represent the organization, so have those ready.
- Your location list with the current name, address, and website for each location you plan to claim.
Who manages your DNS?
- Health systems and hospitals: usually the IT or infrastructure team, often through a change request.
- Practices and groups: your website vendor, MSO or group IT, or your domain registrar (GoDaddy, Cloudflare, and similar).
Get approvals and open the IT ticket before you generate the code
The verification code ChatGPT gives you expires 24 hours after it’s created. Many health systems need longer than that to approve a DNS change. Submit the change request first, agree on a time, then generate the code while IT is ready to add it. If a code expires, you can get a new one in seconds.
Choose the right person to own it
The person who claims the listing verifies their identity with a government ID and becomes the long-term owner. Pick someone who will be with your organization for the long haul and can speak for it, such as a practice administrator, marketing director, or CMO.
Multi-location? Plan the order
- Claim each location at its current address, starting with your highest-volume locations.
- Each claim may come with its own code. If so, add each one as a separate TXT record. Several can sit on the same name without conflict.
- Keep a simple tracker with columns for location, listing claimed, code added, verified, and ID approved.
Part 1: Start your claim
Step 1: Search for your practice
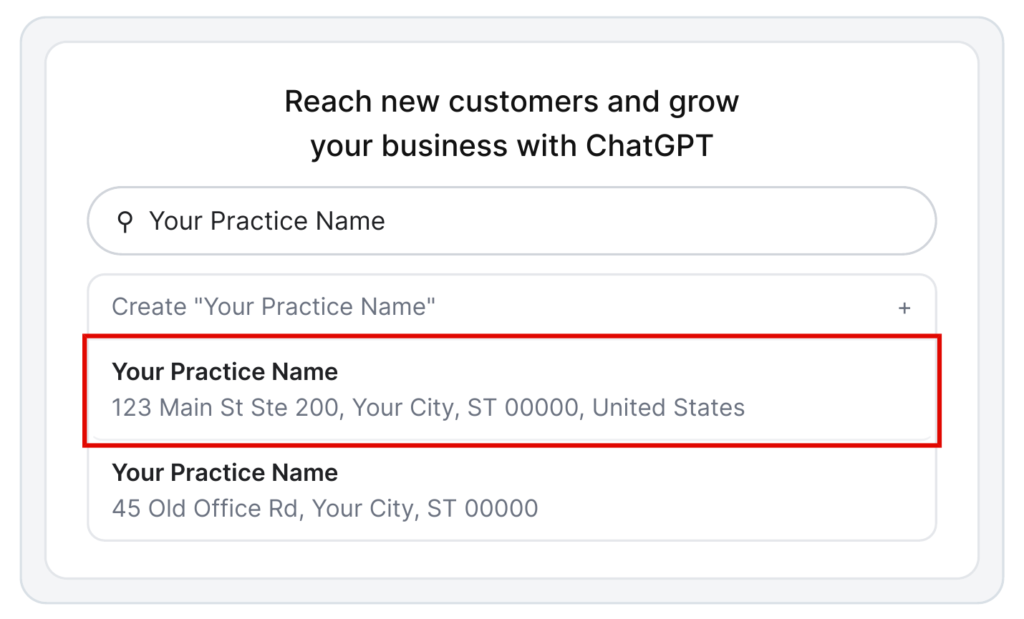
Go to openai.com/business/businesses-in-chatgpt and sign in with your ChatGPT work account. Type your practice name in the search bar and pick the listing that matches your exact street address. Choose “Create” only if your practice doesn’t appear at all.
Seeing more than one listing?
Duplicates are common in healthcare. You might see an old address from before a move, a closed clinic, a legacy name from before an acquisition or rebrand, or separate listings for a department or an individual provider. Claim the one at the current address of the location you’re working on, and note the rest so you can address them later. If a listing belongs to a hospital, health system, or group you’re affiliated with but don’t run, leave it for that organization to claim.
Step 2: Start the claim
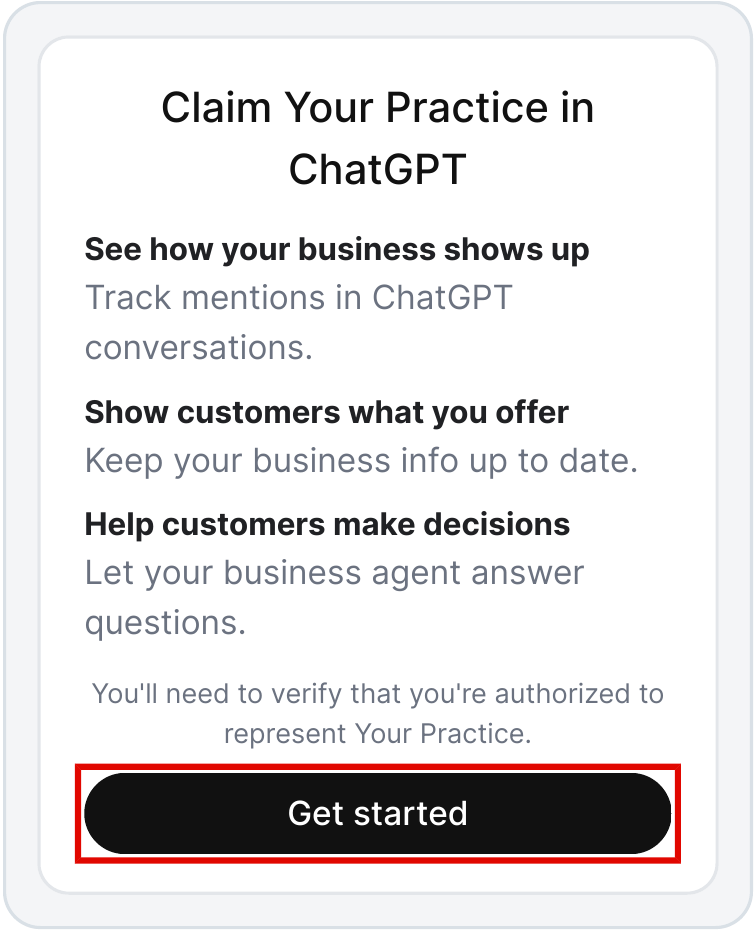
A window titled “Claim [Your Practice] in ChatGPT” will open. Review the benefits and click Get started. The note at the bottom confirms you’ll need to prove you’re authorized to represent the practice, which is the verification step that follows.
Part 2: Get your verification record
Step 3: Choose “Website domain”
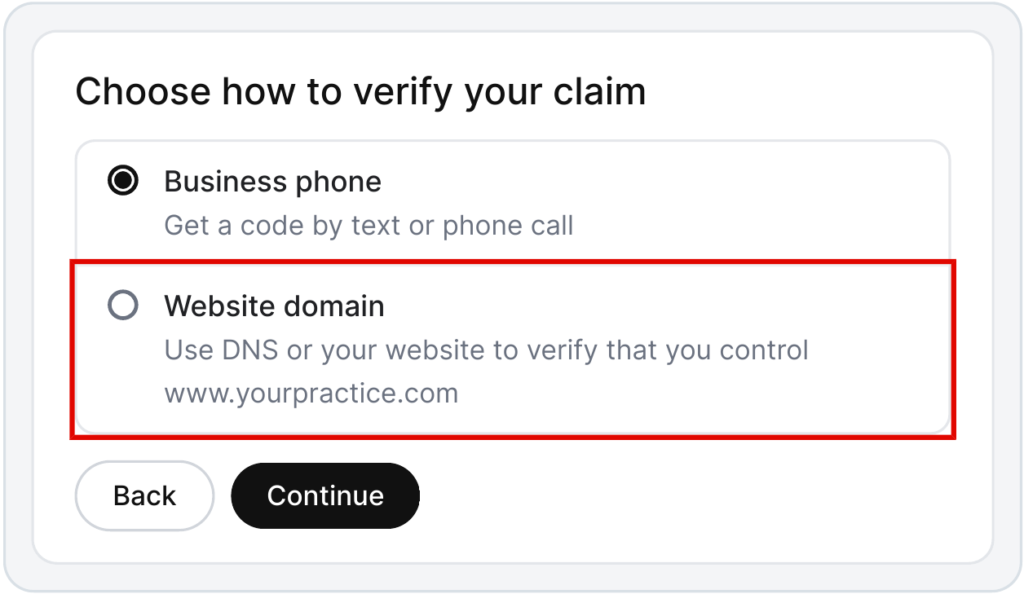
Business phone is selected by default. Switch it to Website domain, then click Continue. Use Business phone only if your listed number rings a person directly.
Check the domain before you continue
ChatGPT verifies the website on your listing. If it shows an old domain, a third-party booking or directory page, or a parent health system domain your team doesn’t control, stop here. Verifying the wrong domain sends the request to the wrong IT team.
Step 4: Copy the three values ChatGPT gives you
ChatGPT now shows a TXT record unique to your practice. Use the copy icons to grab each value exactly. Leave this tab open, because you’ll come back to it in Step 6.
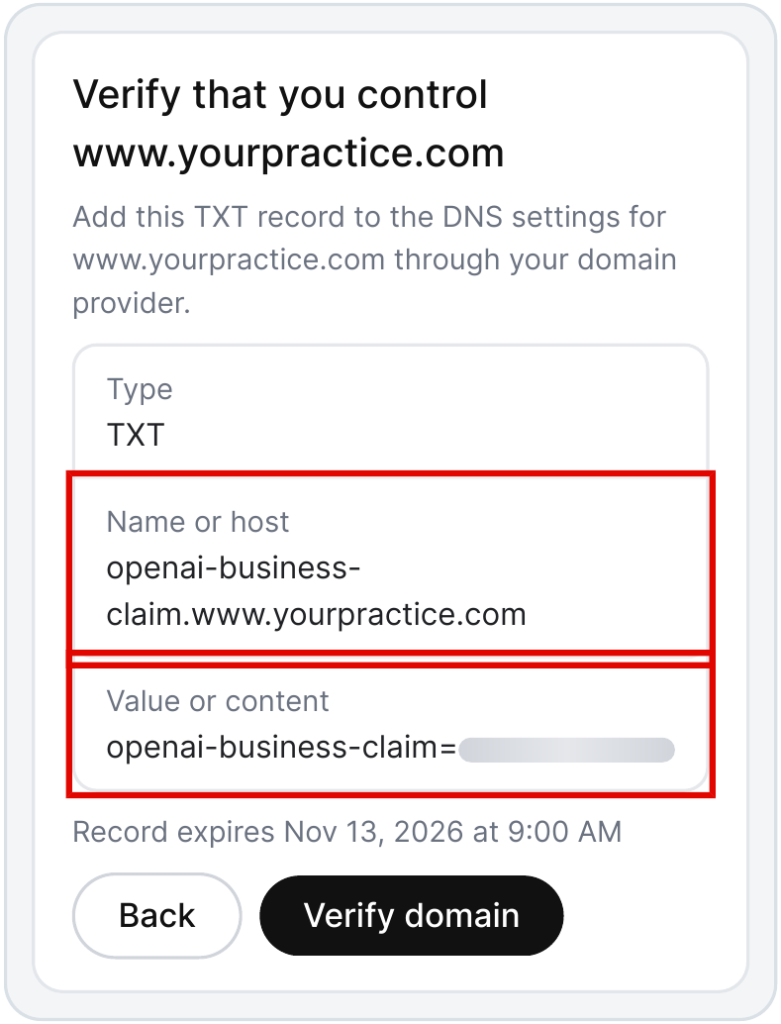
The code expires in 24 hours
Note the “Record expires” time on your screen and share it with IT. If the record isn’t verified by then, click Back and start again to get a new code.
Part 3: Add the record to your DNS
Step 5: Add the TXT record at your DNS provider
Log in where your domain’s DNS is managed, open the DNS records for your domain, and add a new record with the values from Step 4. If IT or a vendor manages your DNS, send them the request below.
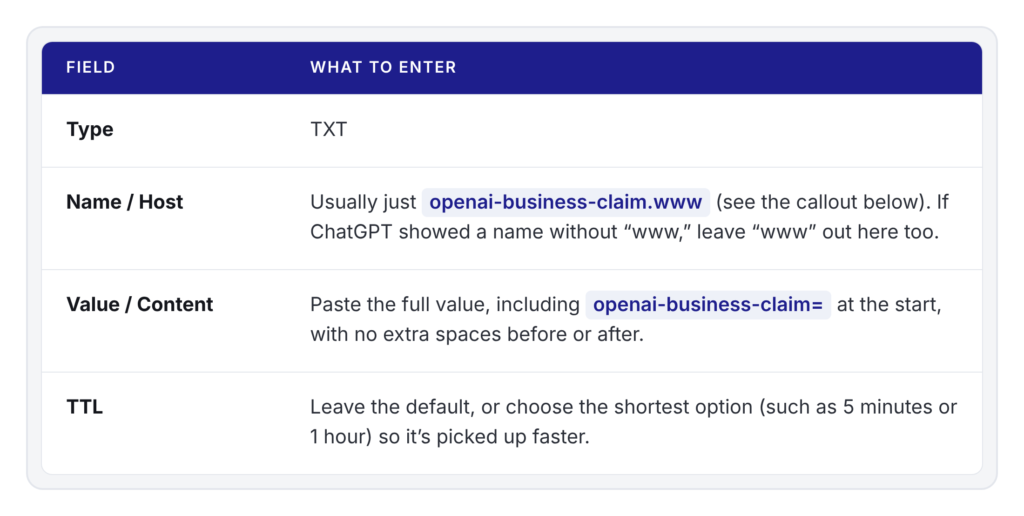
The #1 mistake: entering your domain twice
Most DNS providers automatically add your domain to the end of the Name field. If you paste the full name ChatGPT shows, the record ends up as openai-business-claim.www.yourpractice.com.yourpractice.com and verification fails. Rule of thumb: if your domain already appears next to the Name field, type only openai-business-claim.www. If the field asks for the full name, paste the whole thing.
This won’t affect your website or patient systems
A TXT record only holds text. Leave your existing records (A, CNAME, MX, or other TXT records) as they are, since you’re only adding one new record. No patient data is involved at any point.
Request for your IT team or web vendor
Subject: Change request: add one DNS TXT record for [yourpractice.com]
Hi [Name],
We’re verifying our organization’s business listing in ChatGPT and need one TXT record added to the DNS for [yourpractice.com]. This is an additive change only, so please leave all existing records as they are. It doesn’t affect the website, email, patient portal, or scheduling, and no patient data is involved.
Type: TXT
Name/Host: [paste Name or host from ChatGPT]
Value: [paste Value from ChatGPT]
TTL: default or lowest availableThe code expires on [date and time shown in ChatGPT], so we need it live before then. If your change window is longer than 24 hours, let us know a time that works, and we’ll generate the code just before it. Please reply once it’s live. Thank you!
Part 4: Verify
Step 6: Click “Verify domain,” then be patient
Return to the ChatGPT tab from Step 4 and click Verify domain. DNS changes take time to spread across the internet, so it’s normal to see “We haven’t verified the record yet” the first few times. That message just means OpenAI can’t see the record yet. The button unlocks again after a short countdown.
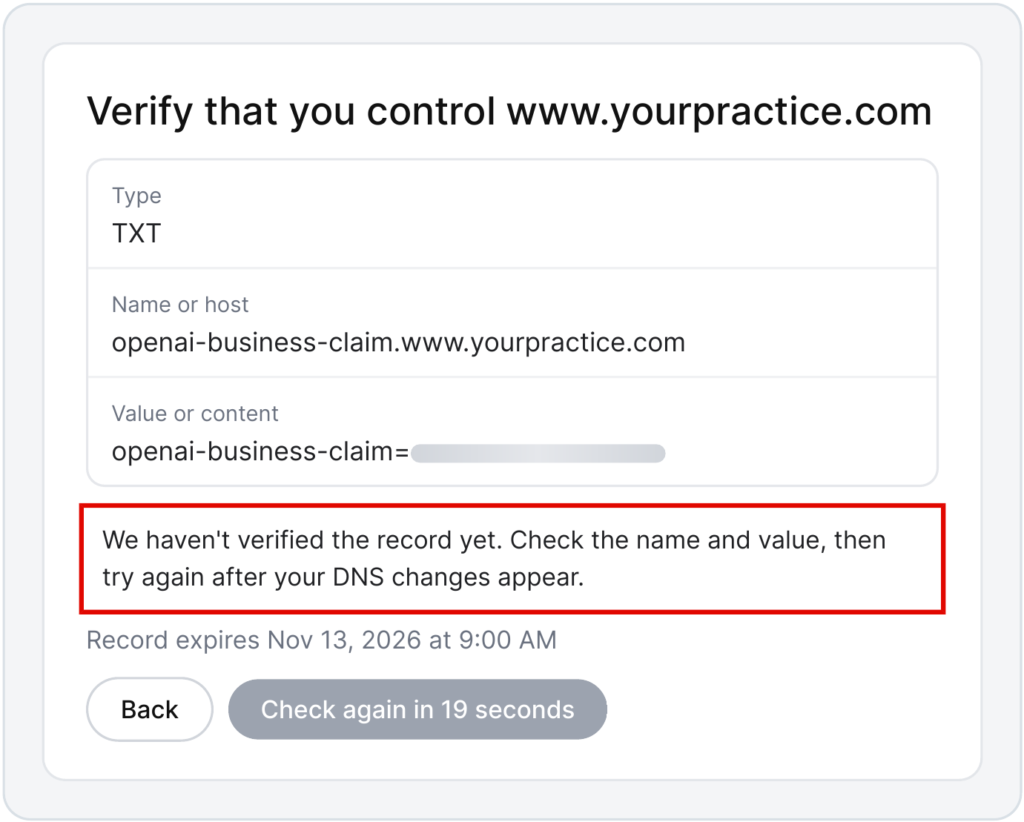
How long should I wait?
Usually a few minutes to a few hours. It can take up to 24 hours, and your code expires at 24 hours, so try again every 30 to 60 minutes instead of waiting overnight.
Check the record yourself
Open toolbox.googleapps.com/apps/dig, choose TXT, and enter the full Name from Step 4 (for example, openai-business-claim.www.yourpractice.com). If your code appears, the record is live, and ChatGPT should pick it up soon.
Still failing after a few hours?
Check three things:
- The Name doesn’t include your domain twice.
- The Value includes the openai-business-claim= prefix.
- There are no extra spaces or hand-typed quotation marks.
Fix the record and click Verify again.
Health system networks
Some hospital networks use internal DNS that differs from what the public internet sees. Run your check with the public dig tool from outside your internal network.
Part 5: Business review
Step 7: OpenAI reviews your claim
Once your domain is verified, the claim moves to review. You’ll see “Claim received” and “Review in progress.” Click Done. There’s nothing else to do on this screen.
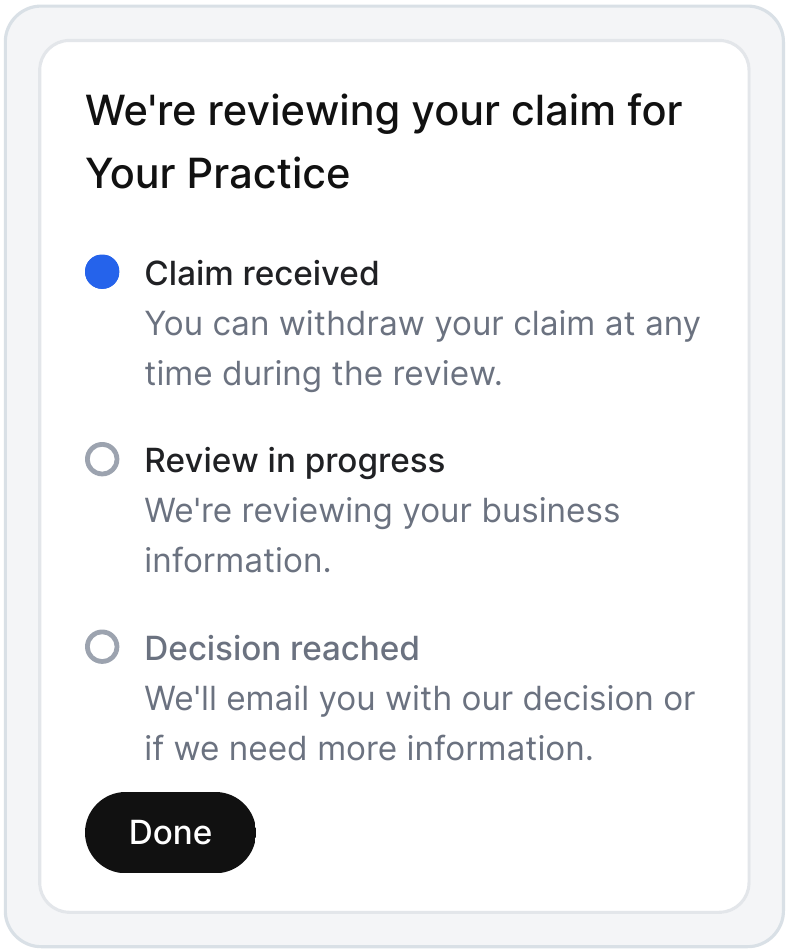
OpenAI will email its decision, or a request for more information, to the address shown under “Decision reached.” Make sure someone is watching that inbox, and check spam filters, which are often strict on hospital email. A request may ask for business registration information or proof that you’re authorized to represent the organization. Reply from that same inbox.
The ID check in Step 8 opens only after this approval, so plan for two reviews, one after the other. Keep the TXT record in place at least until the claim is approved.
Step 8: Verify your identity
Once OpenAI approves your claim, you can open your business dashboard. It shows your address, mentions, profile views, and website clicks. Before you can edit business info or publish a business agent, OpenAI asks the person who claimed the listing to verify their identity. Click Verify in the banner at the top of the dashboard.
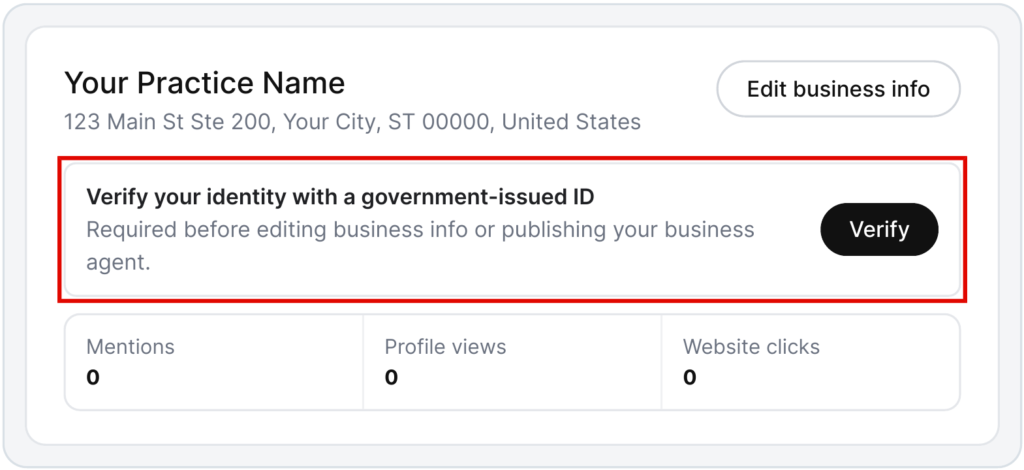
Use the right person
Use the ID of the long-term owner (practice administrator, marketing director, or CMO). Once approved, use Invite to add a backup teammate.
Part 6: Identity verification
Step 9: Upload your photo ID
After you click Verify, choose your ID type and follow the prompts to photograph it. Accepted options include a driver’s license, state ID, passport, or passport card. You can complete this on your phone, which is usually the easiest way to get a clear photo.
Yes, this link is legitimate
OpenAI uses a partner called Persona to handle ID checks, so the page address will read withpersona.com instead of openai.com. That’s expected, and it’s likely why your security team flags the link.
Tips for a smooth upload
Use good lighting, keep all four corners of the ID in frame, avoid glare, and make sure the ID hasn’t expired. Use a government-issued ID, since work and hospital badges don’t qualify.
Step 10: Wait for the ID review (allow a few days)
Once you submit your ID, you’ll see an “Application in review” screen. This review takes longer than the DNS check. Status updates appear in your organization settings, and approval can take a few days.
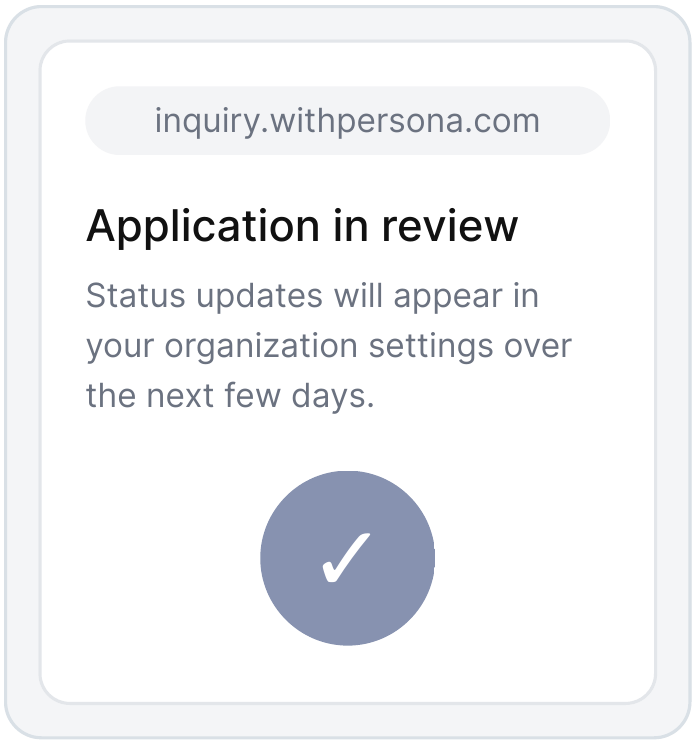
What this means for you
- No need to resubmit. Uploading again can restart the review.
- Editing waits for approval. Until it comes through, you won’t be able to edit business info or publish a business agent.
- Check every day or two. Look in your organization settings in ChatGPT for a status change.
- Follow up after a week. If nothing has changed by then, follow up.
Plan your timeline
From start to finish, plan for IT and compliance lead time, a few hours for DNS, OpenAI’s claim review, then a few days for the ID review. The two reviews happen one after the other. Start early if a new location opening, a rebrand, or a service line launch depends on it.
Set it up like your front desk
If you publish a business agent, treat it like a new front-desk hire. It should handle the questions your front desk answers every day: hours, locations, parking, insurance accepted, new-patient steps, and how to book. It shouldn’t diagnose, triage, or give medication advice. It also shouldn’t collect protected health information, so send patients to your scheduling line, portal, or booking page for anything specific to them. Don’t assume the product is covered by a Business Associate Agreement (BAA). Give the agent clear emergency instructions to direct urgent needs to 911, and behavioral health crises to the 988 Suicide & Crisis Lifeline. Run clinical claims and patient stories through the same medical and compliance review your website gets. Programs covered by 42 CFR Part 2 should keep the agent to general program information. Before anything goes live, review the full setup with your compliance or privacy lead, and make sure your names, addresses, providers, and “accepting new patients” status match your Google Business Profile, website, and directories.
Troubleshooting at a glance
- “We haven’t verified the record yet.” This is normal while DNS updates. Wait 30 to 60 minutes, click Verify domain again, and confirm the record with the Google dig tool.
- The record expired. Click Back and choose Website domain again to get a new code. Replace the Value in your existing TXT record with the new one.
- IT can’t make the change within 24 hours. Schedule the change window first, then generate the code right before it opens.
- The dig tool shows nothing. The record isn’t live yet, or the Name is wrong. Check whether your domain appears twice in the record name.
- The listing shows the wrong website. Stop before verifying. An old or third-party domain won’t work.
- There are several listings for one location. Claim the one at the current address and track the others to address later.
- Your practice isn’t listed. Use “Create ‘[Practice Name]’” at the top of the search results. OpenAI may limit new listings for local businesses during the beta.
- No email from OpenAI yet. Reviews take time. Check spam and quarantine folders for the address shown on the review screen.
- You can’t edit your business info. Complete the government ID verification from the dashboard banner first. If you already did, the ID review is likely still in progress.
- “Application in review” for days. This is normal. Check your organization settings and avoid resubmitting.
Download the full guide
Want this as a printable walkthrough to share with your IT team? Our guide includes every step above, a checklist, and the full healthcare guardrails in one PDF.
If you want help coordinating with IT, sorting out duplicate listings, or making sure your ChatGPT listing supports your broader SEO and AI visibility strategy, our team is happy to walk through it with you.
